This cute Macrame Rainbow is a fun craft that uses rope and yarn to create a really sweet wall hanging for your child’s bedroom.

We had so much fun making this Macrame Rainbow! My 7-year-old daughter enjoyed every step of this project – from picking out yarn colors to adorning her bedroom wall with this cute wall hanging.
What you need to make your own Macrame Rainbow
- Rope – I used about 4 yards of white 1/8 inch twisted nylon rope. Thicker and longer rope would work fine if you wanted a larger rainbow.
- Yarn – You will need to use four different colors of yarn for your rainbow. This first day of fall is right around the corner, so we chose autumn-inspired colors for ours, but any colors would work!
- Cardboard – This is what you use to attach your rainbow to, to give it stability and keep it in place. Thin cardboard like from a cereal box works best, so that it’s not too heavy.
- Tape – This is optional, but I found it handy to tape the pieces of rope together before wrapping them with yarn.
- Hot glue/gun – This will be used to glue your rope rainbow rows onto the the piece of cardboard to hold it in place.
- Scissors – You’ll need a sharp pair of scissors to cut the rope, the yarn, and the cardboard.
- Pencil – This is used to draw the shape of the rainbow onto the cardboard.
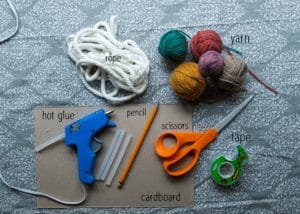
How to Make a Macrame Rainbow
- Gather supplies – It helps to gather all your supplies initially, so they are all in one place and easy to access throughout the entire project.
- Position the rope – First, you’ll need to lay out your rope in a rainbow shape, starting with the outside rainbow strip and ending with the inside strip. You’ll need to do 8 passes.
- Tape ends together – Once you have your rainbow shape even on either side, grab your tape to attach two pieces of rope together, to make the strip a little thicker. Put the tape about 2 inches from the bottom. Go across the bottom. You’ll end up with four pieces on each side.
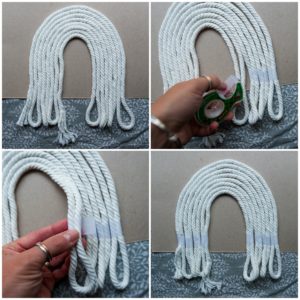
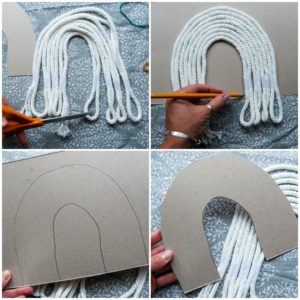
- Cut the rope ends – After your rainbow shape is secure, cut the ends of the rope apart, so they are no longer lopped and instead hang down straight.
- Draw the rainbow guide – Lay your rainbow shaped rope onto the thin cardboard and trace the outline of the rainbow to create a template.
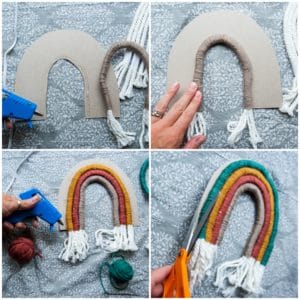
- Wrap with yarn – Pick out your first color of yarn for the outside row. Add a dab of hot glue on the tape, about two inches from the bottom, to secure the ends of your yarn. Then, tightly wrap the yarn up the rope, around and around, until the entire rope is covered with the yarn. At the other end, add another dab of hot glue to secure the other end of the yarn. Once you are at the bottom and it feel secure, cut off the yarn. Wrap the three remaining rows of rope with other yarn colors.
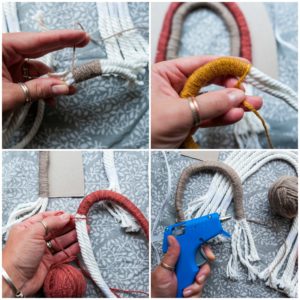
- Glue on the rainbow rows – After all four rope rows are wrapped in yarn, take each row and glue it on the cardboard rainbow shape, starting with the inside row and working out.
- Trim the cardboard – Once your rainbow rows are securely glued in place, grab a pair of scissors and trim off the excess cardboard. You don’t want to be able to see the cardboard from the front of the rainbow.
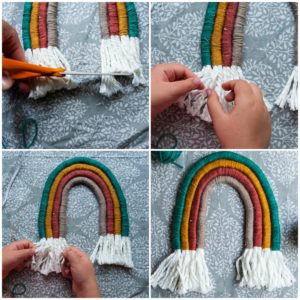
- Trim the rope ends – After your rainbow is glued on and secure, take your scissors and trim up the ends of the rope so they are even all the way across.
- Unravel the ends – Now, unravel the ends of the rope.
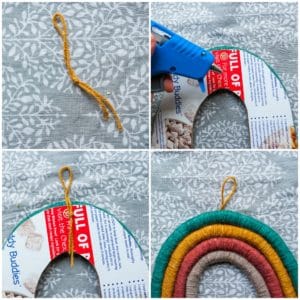
- Create a hanger – Take a small piece of yarn, about three inches long, and knot the ends together. Glue the knotted end to the back of the cardboard in the middle top position, leaving the loop exposed. You’ll use this to hang up your rainbow.
- Hang up and enjoy – All to do now is choose a spot on your wall to display your beautiful rainbow!
Why we love this Macrame Rainbow craft
- Benefits brain development – Wrapping yarn around the rope is a great way to encourage hand-eye coordination and increase concentration. Tackling this challenge will also help develop your child’s perseverance.
- Benefits physical development – This craft is a great way for kids to practice fine motor skills because it builds dexterity and strength in the muscles of your child’s hands, fingers, and thumbs.
- Inexpensive – We have a big stash of yarn we use for all kinds of projects, like our Twig Letters and our Pinecone Flowers. But even if you don’t have a bunch of yarn on hand, yarn varies greatly in quality and price. You do not need to choose an expensive, high quality yarn for this project if you’re on a budget. You can find lots of yarn options at your local craft store or try shopping online at Micheals.


How to Make a Macrame Rainbow
This cute Macrame Rainbow is a fun craft that uses rope and yarn to create a really sweet wall hanging for your child's bedroom.
Materials
- Rope
- Yarn
- Cardboard
Tools
- Scissors
- Pencil
- Hot glue/glue gun
Instructions
First, gather supplies.
First, you'll need to lay out your rope in a rainbow shape, starting with the outside rainbow strip and ending with the inside strip. You'll need to do 8 passes.
Once you have your rainbow shape even on either side, grab your tape to attach two pieces of rope together, to make the strip a little thicker. Put the tape about 2 inches from the bottom. Go across the bottom. You'll end up with four pieces on each side.
After your rainbow shape is secure, cut the ends of the rope apart, so they are no longer lopped and instead hang down straight.
Lay your rainbow shaped rope onto a thin piece of cardboard and trace the outline of the rainbow to create a template.
Pick out your first color of yarn for the outside row. Add a dab of hot glue on the tape, about two inches from the bottom, to secure the ends of your yarn. Then, tightly wrap the yarn up the rope, around and around, until the entire rope is covered with the yarn. At the other end, add another dab of hot glue to secure the other end of the yarn. Once you are at the bottom and it feels secure, cut off the yarn. Wrap the three remaining rows of rope with other yarn colors.
Now, youll need to glue the rows onto the cardboard template. Grab your hot glue gun and glue each row securely in place, starting with the inside row and working out.
Once your rainbow rows are securely glued in place, grab a pair of scissors and trim off the excess cardboard. You don't want to be able to see the cardboard from the front of the rainbow.
After your rainbow is glued on and secure, take your scissors and trim up the ends of the rope so they are even all the way across
Now, unravel the ends of the rope.
Lastly, take a small piece of yarn, about three inches long, and knot the ends together. Glue the knotted end to the back of the cardboard in the middle top position, leaving the loop exposed. You'll use this to hang up your rainbow.
Now all you need to do is choose a spot on your wall to display your beautiful rainbow!
Leave a Reply