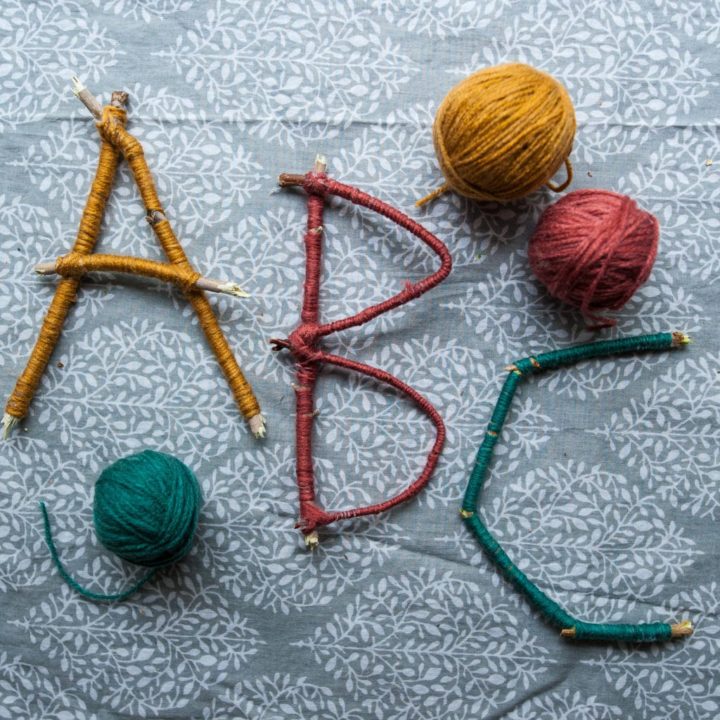
These Twig Letters are a fun and interactive way to teach little ones their letters and help them practice their fine motor skills too!
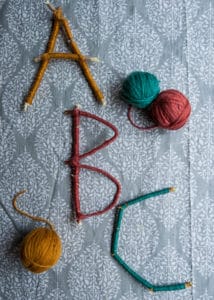
Heading back-to-school looks a lot different for many of us this year. Like a lot of other kids out there, mine will be participating in remote-learning this year. This is new, uncharted territory for us. But we’re going into it with open hearts and minds and we will do our best! I have total confidence in their excellent teachers, but I do want to supplement their curriculum with some fun nature-based crafts, especially for my preschooler. These Twig Letters are an excellent way to get young kids excited about learning their ABCs!
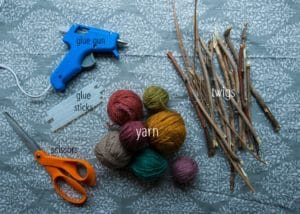
Materials needed for Twig Letters
- Twigs
- Yarn
- Hot glue gun
- Glue sticks
- Scissors
How to Make Twig Letters
- Pick out twigs – The first thing you’ll need to do is head outside and collect several different twigs of varying sizes and lengths. You will also want to gather a few green twigs from a live bush, because they will be easier to shape into curvey letters like “C” and “O.”
- Pick out yarn – We have a big sack full of yarn that I’ve collected over the years. I let my kids pick out the colors they wanted to use. You could use vibrant colors or more subdued earthy ones like we did. You could choose to make all your letters the same color or choose a variety of colors!
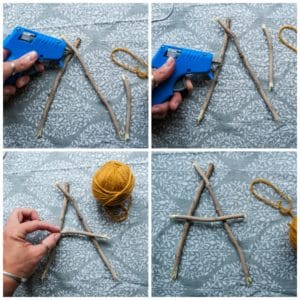
- Create letter shapes – Now it’s time to decide what letters you want to make. Maybe you want to spell a name? Or perhaps create an encouraging word? We decided to just create the first three letters of the alphabet, but my kids will likely make their initials next time. To create the letters, we merely chose various twigs and laid them out flat in the letter formation.
- Glue twigs together – Once you have chosen your letters and positioned the twigs to create them, grab a hot glue gun to glue the twigs together. The glue will secure them, so they don’t fall apart as you wrap them with yarn.
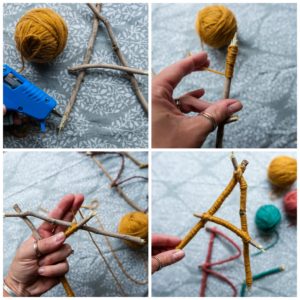
- Wrap with yarn – Add a dab of hot glue at the end of one twig, to secure the yarn to the twig. Then, begin wrapping the yarn around and around the twig moving from one end to the other. Be sure to wrap tightly, so that the yarn covers the twig evenly. When you reach an angle, wrap it a few times in an “X” formation before making the turn. Once you’ve reached the other end of the twig, add another dab of hot glue to secure the end of the yarn. Cut off the excess yarn.
Why parents love Twig Letters
- A nature based activity – Any craft or activity that connects my kids to the natural world makes me happy! My kids love being outside and they love bringing the outside into our homes. Nature based activities like this are perfect for Forest School and great for anyone who is interested in getting their kids more enthusiastic about nature!
- A way to practice fine motor skills – Tightly wrapping yarn around the twigs takes a lot of concentration and finger control. I didn’t push my kids to finish all in one setting and I definitely helped here and there, but over a few days, they were able to accomplish wrapping these letters, and they were so proud! It’s a great way to practice manual dexterity and gain strength and mobility in their small fingers.
- A unique way to learn ABCs – Anybody have a preschooler who loves being read to, but has no real interest in learning to read themselves yet? Whelp, I sure do! I loved this activity because these Twig Letters really got my son actively engaged in learning a few of his letters. It’s a great hands-on tool to encourage reading and it really bolstered my son’s enthusiasm for it.
- A sweet wall decoration – With many of us returning to school remotely this year, we may be looking for sweet little ways to decorate our children’s new learning space in our homes. These letters are adorable! I hung these on the wall beside my kids’s remote-learning work station. They have helped create a warm and welcoming learning environment for our kids.
How to Make Twig Letters
These Twig Letters are a fun and interactive way to teach little ones their letters and help them practice their fine motor skills too!
Materials
- Twigs
- Yarn
Tools
- Hot glue
- Glue sticks
- Scissors
Instructions
1. Head outside and collect several different twigs of varying sizes and lengths. You will also want to gather a few green twigs from a live bush, because they will be easier to shape into curvey letters like "C" and "O."
2. Now, choose the yarn you would like to use. You could use vibrant colors, soft colors, or earthy colors. You could choose to make all your letters the same color or choose a variety of colors!
3. Decide what letters you are going to make. Then, choose various twigs and lay them out flat in the shape of the letter.
4. Once you have chosen your letters and positioned the twigs to create them, grab a hot glue gun to glue the twigs together. The glue will secure them, so they don't fall apart as you wrap them with yarn.
5. Finally, add a dab of hot glue at one end of a twig, place the yarn tale into the glue, and begin wrapping the yarn into the glue, to secure the end of the yarn to the twig. Then begin wrapping the yarn around and around the twig moving from one end to the other. Be sure to wrap tightly, so that the yarn covers the twig evenly. When you reach an angle, wrap it a few times in an "X" formation before making the turn. [Please note, for more complex letters, like "A," that doesn't have a seemless shape, you may need to cut the yarn, glue down the end, and begin again.] Once you've reached the end of the twig, add another dab of hot glue to secure the end of the yarn. Cut off the excess yarn.
Leave a Reply