These Oak Owls are a sweet way to welcome fall and create some really cute nature art using materials that come from oak trees.
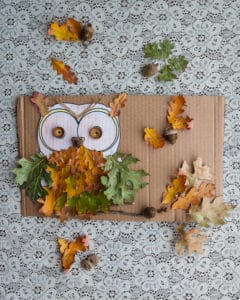
It’s only the end of September, but the leaves are already beginning to turn vibrant colors here in Santa Fe! We collected a bunch to make these adorable Oak Owls: a nature portrait made entirely of materials from oak trees and recycled items. Read on to hear how we created our owls.
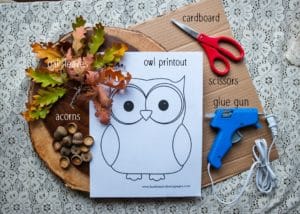
Collect materials needed to make Oak Owls
- Oak leaves – Grab various colors and sizes of oak leaves for this project.
- Acorns and acorn caps – Under an oak tree, you’ll surely find several acorn caps and a few whole acorns if the squirrels haven’t have them first.
- Thin branches – When you collect your oak leaves, grab a few thing branches too, to add to your portrait.
- Cardboard – You’ll need a medium size of durable cardboard to use for this project.
- Printable owl template – We found our owl template after a simple google search, and any owl you like will do, but here is the template we used: Owl Template
- Scissors, colored pencils, and a hot glue gun – You’ll need scissors to cut out your cardboard and paper owl, colored pencils to color your owls before glueing on its “feathers,” and a hot glue gun to glue on leaves and acorn caps.
How to make Oak Owls
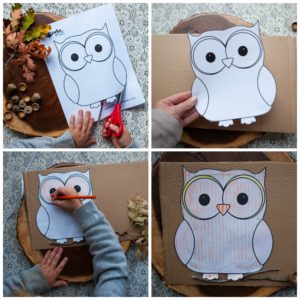
- Print out an Owl Template – The base of this crafting project is the owl template. You can draw your owl on a piece of paper or use any template you like. We recommend keeping it simple and letter-sized. We found our owl online from a simple google search, and we saved it here for you to use as well.
- Cut out and color the owl template – Carefully cut out the owl and glue it to the piece of cardboard you are using. Using colored pencils or crayons, lightly color in the blank owl however you like. Coloring the paper is totally optional, but it does make the exposed parts of the owl in the finished product look nice.
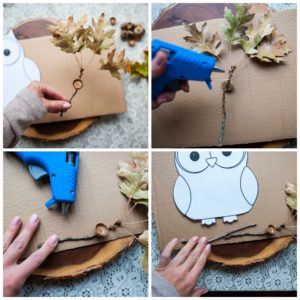
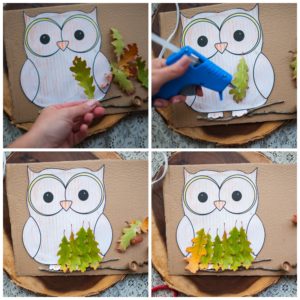
- Glue an oak twig onto cardboard – Now, using a thin twig from an oak tree, create a cute little limb for your owl to perch on. Glue it onto the cardboard, horizontally, near the bottom, under the owl’s feet. You could add a few oak leaves or an acorn to the twig if you’d like!
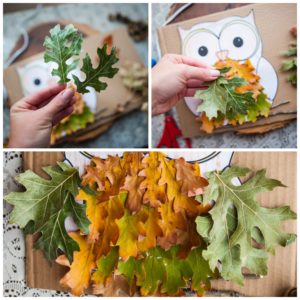
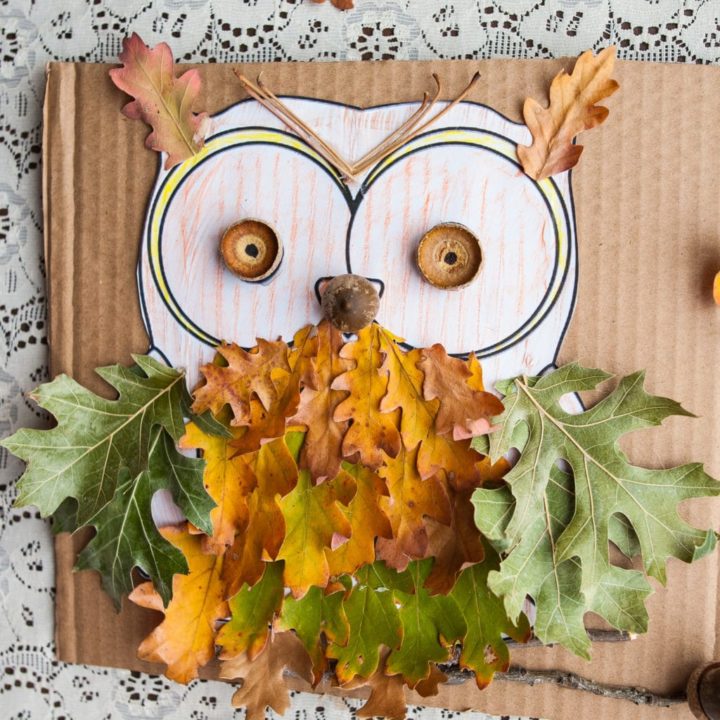
- Create feathers with oak leaves – Pick out enough leaves to use all over the owl’s chest and belly. You’ll want larger leaves for the bottom row, medium sized leaves for the middle row, and small leaves for the top row. Glue the oak leaves pointing down along the bottom row first, and fill in the middle row next, and the top row last.
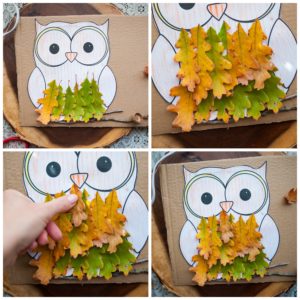
- Create wings with oak leaves – Find four matching large oak leaves to use for the wings. Glue two staggered leaves to each wing area.
- Create eyes with acorn caps – Find two matching acorn caps, and add hot glue the outsides of them. Press firmly against the paper owl’s eyes to secure them to the paper. Then, with a black permanent marker, add small circles in the middle of the insides of acorn caps to create the eyes.
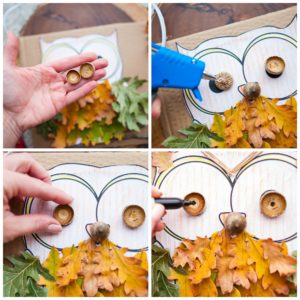
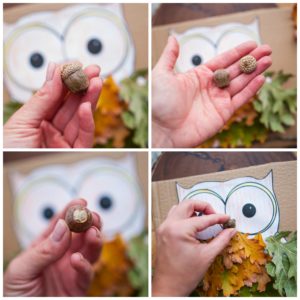
- Create a beak with an acorn – Find a whole acorn, remove the cap, and then add a dab of hot glue to the top of the nut. Firmly press it to the owl’s beak until the glue dries.
- Create eyebrows and horns – Glue two matching leaves, shooting up, at the top of the owl’s head, to create the owl’s horns. Then cut off stems from several oak leaves to use as the eyebrows. Add a “V” shape of glue in between the eyes and then add 3 or 4 of the stems on either side to create eyebrows.

Why we love Oak owls
- A great way to welcome fall – This is a sweet craft that uses autumn leaves to decorate a creature we all associate with fall – an owl. It gets children connected to the current season by using the materials that can only be found this time of year.
- Nature based art project – We love nature based art projects, because it gets kids out into nature and connects them to the world around them. This craft reminds me of our Nature Portraits and Nature Paper Dolls, because it encourages making art with nature items. It also gets kids out in the fresh air and also helps them value the earth and it’s materials even more.
- Forest School activity – This is a really fun Forest School activity, because it can be a way to teach kids about owls and other woodland creatures as well as trees we can find in the forest, like Oak Trees!
- Uses creativity and fine motor skills – This craft combines creativity and also using your hands to do relatively tricky things. Cutting, coloring, glueing, and creating patterns with leaves all require a lot of dexterity in your hands, so it’s a great way for your child to practice their fine motor skills. This craft also requires a big imagination to create an owl that is uniquely their own.

How to Make Oak Owls
Materials
- Oak leaves
- Acorns
- Acorn caps
- Oak twig
- Owl template
- Cardboard
Tools
- Hot glue gun
- Scissors
- Colored pencils or crayons
Instructions
1. Print out an Owl Template - The base of this crafting project is the owl template. You can draw your owl on a piece of paper or use any template you like. We recommend keeping it simple and letter-sized. We found our owl online from a simple google search, and we saved it here for you to use as well.
2. Cut out and color the owl template - Carefully cut out the owl and glue it to the piece of cardboard you are using. Using colored pencils or crayons, lightly color in the blank owl however you like. Coloring the paper is totally optional, but it does make the exposed parts of the owl in the finished product look nice.
3. Glue an oak twig onto cardboard - Now, using a thin twig from an oak tree, create a cute little limb for your owl to perch on. Glue it onto the cardboard, horizontally, near the bottom, under the owl's feet. You could add a few oak leaves or an acorn to the twig if you'd like!
3. Create feathers with oak leaves - Pick out enough leaves to use all over the owl's chest and belly. You'll want larger leaves for the bottom row, medium sized leaves for the middle row, and small leaves for the top row. Glue the oak leaves pointing down along the bottom row first, and fill in the middle row next, and the top row last.
4. Create wings with oak leaves - Find four matching large oak leaves to use for the wings. Glue two staggered leaves to each wing area.
5. Create eyes with acorn caps - Find two matching acorn caps, and add hot glue the outsides of them. Press firmly against the paper owl's eyes to secure them to the paper. Then, with a black permanent marker, add small circles in the middle of the insides of acorn caps to create the eyes.
6. Create a beak with an acorn - Find a whole acorn, remove the cap, and then add a dab of hot glue to the top of the nut. Firmly press it to the owl's beak until the glue dries.
7. Create eyebrows and horns - Glue two matching leaves, shooting up, at the top of the owl's head, to create the owl's horns. Then cut off stems from several oak leaves to use as the eyebrows. Add a "V" shape of glue in between the eyes and then add 3 or 4 of the stems on either side to create eyebrows.
Leave a Reply