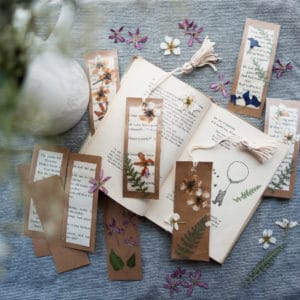
We love these Nature Bookmarks! They’re really pretty and easy to make, but they also encourage creativity, reading, and a deeper connection to nature for your child.
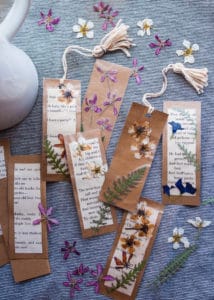
There’s so much to love about these pretty handmade bookmarks! From gathering materials to use, to pressing the flowers, to decorating, to using them, we hope you love these bookmarks as much as we do!
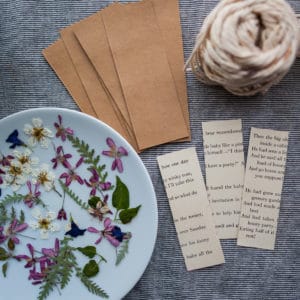
Materials Needed to Make Nature Bookmarks
- Pressed flowers – At least a week before making your bookmarks, gather flowers and other materials and press them between the pages of a large, heavy book to use later.
- Cardstock – We used a heavy brown cardstock paper to use for our bookmarks. It doesn’t need to be brown like ours, but it does need to thicker and sturdier than a regular piece of drawing paper.
- Contact paper – Clear contact paper is used to keep your pressed flowers in place on your bookmark. It can be found in most large stores or here on Amazon.
- Yarn or string – Thin yarn or thick string will be needed to make a tassel for your bookmark. This step is totally optional, but if you decide to do it, feel free to use any color you like!
- Old book – We tore a page from a children’s book to use for additional decoration for our bookmarks, but this step is optional too.
- Mod-Podge – We used Mod-Podge to seal the flowers and leaves onto our bookmark before adding contact paper. This isn’t entirely necessary, but I did find that it created a more secure hold. It also helped keep our flowers in place and not shift as we attached the contact paper.
How to Make Nature Bookmarks
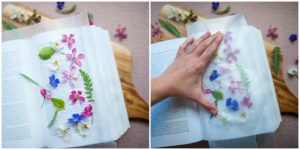
- Press your flowers – You will need to use pressed flowers for this project, so be sure to give yourself enough time to prepare. It takes about 7 days to press and dry flowers completely. Follow the steps we used in our Pressed Flower Ornaments post to press your flowers. You’ll just need to collect flowers, arrange them in between two pieces of wax paper, keep them inside the pages of a very big heavy book, and leave them alone to flatten and dry for at least a week.
- Measure and cut your bookmarks – Grab a few pieces of thick cardstock paper and measure and cut it to about 2 in. x 5 in. We added a piece of paper from an old book to give it a little more character. This is optional, but if you decide to do this too, use a piece of the page that is a little smaller than the cardstock. We cut our piece about 1.5 in. x 4 in. Then glue it onto the middle of the cardstock paper.
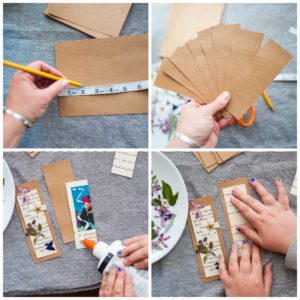
- Arrange – Once you’ve prepared the base level of bookmark, it’s time to arrange flowers onto it. Carefully place your pressed flowers around your bookmark in any design you like.
- Seal with Mod-Podge – This step is optional, but I felt like it gave an extra secure hold so our flowers wouldn’t shift at all. If you choose to seal with Mod-Podge, you’ll need to paint a thin layer of Mod-Podge onto the paper. Then, arrange your flowers and paint another thin layer of Mod-Podge over the flowers. Wait at least 10 minutes for it to dry before moving on to the next step.
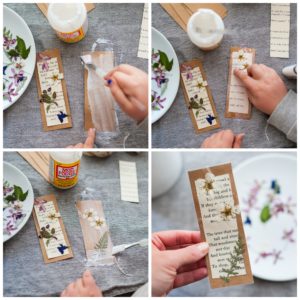
- Adhere with contact paper – Cut out a piece of contact paper that is slightly larger than your bookmark. Peel off the back and then carefully place it, sticky side down, on top of your bookmark. Using the tips of your fingers, with medium pressure, smooth out the trapped air, until you have a smooth surface without any air bubbles.
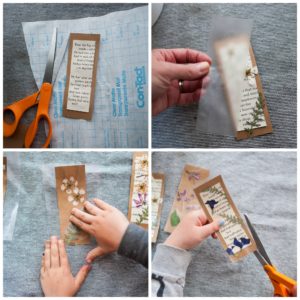
- Trim – Once the contact paper is securely attached to your bookmark, grab a pair of scissors and carefully trim off the excess contact paper along the sides.
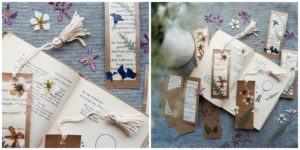
- Add a tassel – Adding a yarn tassel to your bookmark is totally optional, but I think it adds a really special finishing touch to the bookmarks. You will need to punch a hole at the top of your bookmark and then make a tassel. Follow the steps in our Shamrock Wall Hanging post to make a tassel. Tie your tassel to the hole at the top and your bookmark is complete!
Why we Love Nature Bookmarks
- Forest school inspired activity. Forest school focuses on outdoor learning and fosters environmental stewardship. The benefits to outdoor learning are many! Developing motor skills, engaging in creative play, staying healthy, learning how to manage risks, developing independence, and grow their compassion for nature and wildlife are just a few. Learn more about forest school here!
- Connects us to nature. This activity gets your child outside in nature to collect the materials they would like to use for their bookmarks. It also gives them a way to hold on to a little piece of nature, which will help deepen their connection to it!
- Encourages creativity. There are so many benefits to artistic creativity for kids. Creating art is just as important to your child’s development as learning science or math! It’s important for their large and fine motor skill development, it can boost their self-esteem, it’s a great way to relieve stress or anxiety, and it’s fun!
- Encourages reading. It is so much easier to build reading skills when your child enjoys reading. Having a special bookmark for their book will give them extra motivation to read every day!
- They make really sweet gifts. I don’t know about you, but hand-made gifts are my absolute favorite. They’re unique and a come straight from your child’s heart. We are planning to give these away as birthday gifts, future Mother’s and Father’s Day gifts, and just-because-I-love-you gifts.
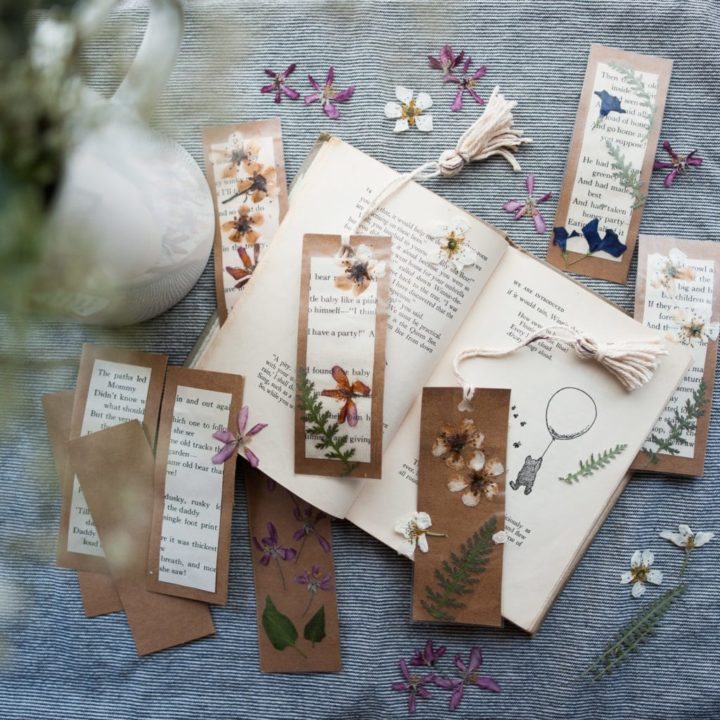
How to Make Nature Bookmarks
We love these Nature Bookmarks! They're really pretty and easy to make, but they also encourage creativity, reading, and a deeper connection to nature for your child.
Materials
- Pressed flowers
- Card stock paper
- Page from an old book
- Contact Paper
- Glue
- Mod-Podge
- Yarn or string
Tools
- Scissors
- Measuring tape
- Hole punch
- Paint brush
Instructions
1. First, you'll need to collect flowers, arrange them in between two pieces of wax paper, keep them inside a very big heavy book, and leave them alone to flatten and dry for at least a week. It takes about one week to press flowers.
2. Grab a few pieces of thick card stock paper and measure and cut it to 2 inches by 5 inches. You can also add a piece of paper from an old book to give it a little more character. This is optional, but if you decide to do this too, use a piece of paper about 1 1/2 inches by 4 inches big. Then glue it onto the middle of the card stock paper.
3. Once you've prepared your bookmark, it's time to arrange materials onto it. Carefully place your pressed flowers around your bookmark in any design you like.
4. This step is optional, but it will give a very secure hold so the flowers won't shift at all when you apply the contact paper. If you choose to seal with Mod-Podge, you'll need a paintbrush. Then, paint a thin layer of Mod-Podge onto the paper, arrange your flowers, and then paint another thin layer of Mod-Podge over the flowers. Wait at least 10 minutes for it to dry before moving on to the next step.
5. Cut out a piece of contact paper that is slightly larger than your bookmark. Peel off the back and then carefully place the contact paper, sticky side down, on top of your bookmark. Using your fingers, with medium pressure, smooth it out, to release any trapped air.
6. Once the contact paper is securely attached to your bookmark, grab a pair of scissors and carefully trim off the excess contact paper along the sides.
7. Adding a yarn tassel to your bookmark is totally optional, but it adds a really special finishing touch to the bookmarks. You will need to punch a hole at the top of your bookmark and then make a tassel. Follow the steps in our Shamrock Wall Hanging post to make a tassel. Tie your tassel to the hole at the top and your bookmark is complete!
Leave a Reply