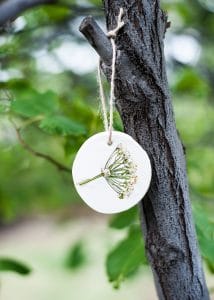
Making pressed flower ornaments is a sweet nature-based craft that will engage your child’s interest and provide a beautiful reminder of summer all year long.
The last day of summer is less than a week away! As our final salute to summer, my daughter and I wanted to do something special before the season turns to fall and we begin welcoming shorter days, cooler temperatures, and pumpkin flavored everything. She and I decided to hold on to one of our favorite parts of summer: the flowers. Using dried pressed flowers, we made delightful pressed flower ornaments to keep a little piece of summer all year long.

This is a relatively simple nature-based craft, but it does take some planning and preparation. It requires a little patience, since it takes a little over a week to complete. It requires a few supplies too. Keep scrolling to learn exactly what you will need for this craft and how to do it.
How to prepare flowers for pressed flower ornaments:
Collect flowers. First, you will need to collect flowers for your clay ornaments. My daughter and I took a nature walk together and picked a small bouquet of our favorite wildflowers. Actually, this may have been my favorite step in the whole process of this craft. As a mother of more than one child, the one-on-one time with my oldest baby is rare and so special.

Preserve flowers. Second, you will need preserve your flowers by pressing them flat and drying them. After my daughter and I spent a sweet afternoon finding our pretty flowers, we took them home to dry them. First, we trimmed the flowers to a size that would fit on an ornament (around 2×2 inches). Next, we found our biggest, heaviest books and got to work pressing the flowers flat between the pages. We used wax paper between the flowers and the paper, to keep the flowers from sticking and ripping when they were taken off the pages.

Wait. Now is the hard part…letting the flowers just sit, undisturbed for several days. Our flowers took about a week to flatten and dry out properly. Meanwhile, we gathered the other supplies needed for this project: clay, rolling pin, Mod Podge, paintbrush, jam jar, and twine. 
Create. Finally, once the flowers were ready, it was time to create our clay ornaments. Keep scrolling for step-by-step directions.
how to make pressed flower ORNAMENTS:
Choose the clay. There are several varieties of clay to choose from. Air Dry Clay is a great option for children, because there’s no need to bake it. Or you could make your own dough – salt dough or a dough made from cornstarch and baking soda would work well for this project. However, we chose to use white Sculpey Oven Bake Clay for ours.
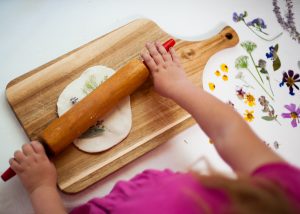
Roll out the clay. After we chose our clay, we formed a medium ball of clay (maybe the size of a tennis ball) and worked it in our hands until the clay was soft and smooth. Then, using a rolling pin, we rolled the ball of clay out flat (a 1/4 inch (6mm) thick). We used a cutting board for this step to make clean-up easy.

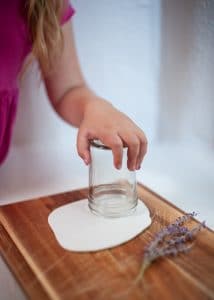
Cut out shapes. Once our clay was rolled out evenly and smoothly, we used a small mouth jam jar to cut out the ornaments. Any cookie cutter would do or even free-handing shapes would work, but I liked the size and circular shape of the jar for ours. Just like making sugar cookies, you’ll need to gather the excess clay to reuse until you’re out of clay. After cutting out several ornaments, we used a small dowel to create a hole at the top, to string twine through at the end.
Set the clay. After the ornaments were cut out, we placed them on a baking sheet, lined with parchment paper, and baked them at 275 degrees for 15 minutes, or until hard (don’t over bake, or they may break). However, if you’re using air-dry clay, you will need to let them sit overnight to harden.

Decorate the ornaments. Once our ornaments were out of the oven and cooled completely, we set up a decorating station. We grabbed our Mod Podge and a paintbrush and spread out the dried pressed flowers on the table, to make it easy to choose from. First, we painted the ornament with a thin layer of Mod Podge, then we gently placed a flower on top of the sticky layer. Once the flowers were in place, we painted a second coat of Mod Podge over them.

Dry the ornaments. After all the ornaments were decorated with all of the beautiful dried pressed flowers and pasted with Mod Podge, we put them back on the baking sheet, and let them sit overnight to fully dry.

String the ornaments. The next day, when our ornaments were completely dry, we used a short piece of twine (about six inches) to string through the hole. Then we tied a knot at the ends to complete the ornament.
Where to use them. We plan on hanging some of our ornaments in the garden and using the rest to decorate throughout the house by hanging in a windows, on doors, or on the knobs of kitchen cupboards. We will also use them as gifts throughout the year. They could be made into garland or turned into a decorative mobile. We may make more when the leaves start turning this autumn and again at Christmas using evergreen or perhaps holly. There are so many possibilities with this nature-based craft!


How to Make Pressed Flower Ornaments
Materials
- Dried pressed flowers
- Clay
- Small dowel
- Mod-Podge
- Twine
Tools
- Cutting board
- Rolling pin
- Cookie cutter (or small mouth jar)
- Small paintbrush
- Baking sheet
Instructions
1. Go out and pick a small bouquet of flowers.
2. Trim your flowers and press them between the pages of a large and heavy book. Leave them to flatten and dry for about one week.
3. When your flowers are dried and ready for use, choose a type of clay to use for your ornaments. Crayola Air Dry Clay or white Sculpey Oven Bake Clay work well.
4. Form a medium ball of clay (the size of a tennis ball) and work it in your hands until the clay is soft and maliable. Then, place the ball on a cutting board and using a rolling pin, roll the ball of clay out flat (1/4 in (6mm) thick).
5. Cut out shapes with cookie cutters or use a small mouth jar for a small circular shape.
6. After cutting out several ornaments, use a small dowl to create a hole at the top, to string twine through when you've completed the craft.
7. Place the ornmaents on a baking sheet, lined with parchment paper, and bake them at 275 degrees for 15 minutes, or until hard (don't over bake, or they may break). If you are using air-dry clay, you will just need to let them sit overnight to harden.
8. Once your ornaments are out of the oven and cooled completely, with a small paintbrush, paint a thin layer of Mod Podge over the ornament. Then, gently place a flower on top of the sticky layer and paint a second thin coat of Mod Podge over the flower.
9. Allow the ornaments to dry overnight. Once comletely dry, use a short piece of twine (about six inches) to string through the hole. Then tie a knot at the end to complete the ornament.
10. Hang your ornaments wherever you please!
Leave a Reply