These Love Lanterns are an easy craft using tissue paper and glass jars which are perfect for Valentine’s Day!
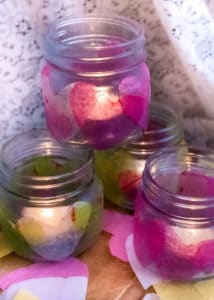
Anybody else’s children really into celebrating holidays with candle-lit dinners? Ha ha, maybe it’s just my kids, but from Christmas to birthdays to Valentine’s Day, my kids LOVE it when we decorate the dining room table with pretty candles to make it more festive. These Love Lanterns decorated with tissue paper hearts totally fit the bill for Valentine’s Day. They are super simple to make and are perfect for Valentine’s Day.

Supplies for making love lanterns
- Jars – Small 8 oz clear glass jam jars. like these, are the perfect size for these small lanterns.
- Tissue paper – We used whatever colors we had on hand, but pinks, reds, purple, and white would be great for Valentine’s Day!
- Mod Podge – This will past the tissue paper hearts onto the glass jars.
- Paint brush – This will be used to apply Mod Podge onto the jars.
- Tea Candles – These will be used inside the jar to light your lanterns when you are all finished.
- Marker – You’ll need this to draw heart shapes onto the tissue paper.
- Scissors – You’ll need scissors to cut out the tissue paper hearts to decorate the jars with.
- Heart templates – Heart shaped templates are option. We used heart cookie cutters, but you could use paper templates or just freehand it!
- Ribbon – This is optional. If you like, you can tie a ribbon to the mouth of the jar for extra decoration.
How to make Love Lanterns
- Gather supplies – First, gather all the supplies you’ll need. Having all your materials on hand will make this project really easy. Also, be sure to use a workspace that you can get dirty, because Mod Podge may get spilled or splattered.
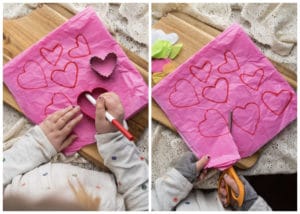
- Trace and cut out hearts – Next, pick out a piece of tissue paper and fold it about four times until it makes a square or rectangle shape. Then start drawing your hearts. Make them relatively small, about 1-2 inches wide, so that they will fit on the jar. We traced heart shaped cookie cutters, but you could use a paper heart template or just free-hand it. Then, carefully cut them out and set aside.
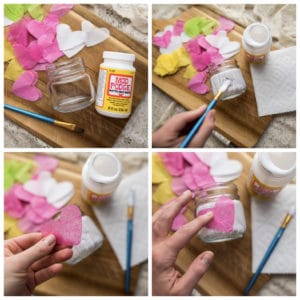
- Apply Mod Podge to your jar – Using a small paintbrush, paint a thin layer of Mod Podge all the way around the outside of the jar.
- Add hearts – Before the layer of Mod Podge dries, start adding tissue paper hearts to the sticky side. Be sure they are laying flat and smooth when you attach them to the glue. And arrange the hearts however you like! Spaced out or over-lapped will all look great.
- Apply another layer of Mod Podge – Once you have your tissue paper hearts in place, paint another thin layer of Mod Podge on top of the hearts to secure them in place.
- Add more tissue paper hearts – You can add another layer of hearts if you like, or just use one layer, like we did.
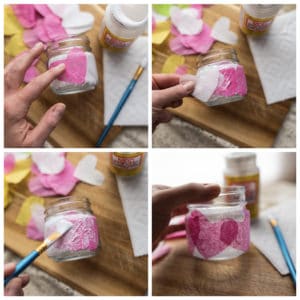
- Wait – The Mod Podge will take about an hour to dry and harden, so it’s best to let them sit untouched before moving to the next step.
- Add more decoration – This step is totally optional, but you could add more decoration to the jar, if you like. You could tie a pink ribbon around the mouth of the jar or sprinkle glitter on the jar or draw designs with a marker.
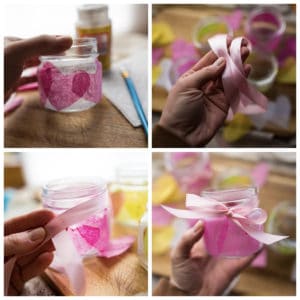
- Add a candle – Finally, once the Mod Podge is dry and hard and you are done decorating, you can add a tea candle to your lantern, light and enjoy!
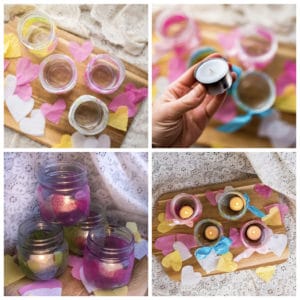
other fun ideas related to Love Lanterns
- Use nature items instead of tissue paper – You could decorate your jars with dried leaves cut in the shape of hearts or use dried and pressed flowers instead of tissue paper.
- Use larger jars – If you’d like a bigger lantern, follow the same methods described above, but use a large mouth, 16oz size canning jar with a larger candle instead.
- Paint the jar – Instead of adding tissue paper hearts, try painting hearts on the jar!
- A similar lantern idea – We made these sweet Fall Lanterns last autumn which follow a similar method and also turn out really pretty!
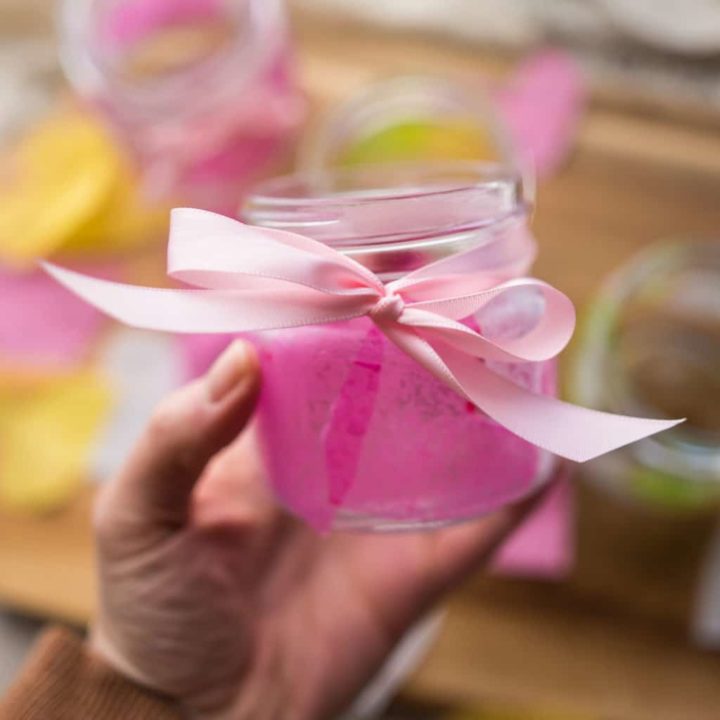
How to Make Love Lanterns
These Love Lanterns are an easy craft using tissue paper and glass jars which are perfect for Valentine's Day!
Materials
- 4 small 8oz glass canning jars
- 4 tea-light candles
- Tissue paper
- Mod Podge
- Heart templates*
- Ribbon*
- *Optional
Tools
- Paint brush
- Marker
- Scissors
Instructions
1. First, gather all the supplies you'll need. Having all your materials on hand will make this project really easy. Also, be sure to use a workspace that you can get dirty, because Mod Podge may get spilled or splattered.
2. Pick out a piece of tissue paper and fold it about four times until it makes a square or rectangle shape. Then start drawing your hearts. Make them relatively small, about 1-2 inches wide, so that they will fit on the jar. We traced heart shaped cookie cutters, but you could use a paper heart template or just free-hand it.
3. Carefully cut them out and set aside.
4. Using a small paintbrush, paint a thin layer of Mod Podge all the way around the outside of the jar.
5. Before the layer of Mod Podge dries, start adding tissue paper hearts to the sticky side. Be sure they are laying flat and smooth when you attach them to the glue. And arrange the hearts however you like! Spaced out or over-lapped will all look great.
6. Once you have your tissue paper hearts in place, paint another thin layer of Mod Podge over the top of the hearts to secure them in place.
7. Now, you can add another layer of hearts if you like, or just use one layer, like we did.
8. The Mod Podge will take about an hour to dry and harden, so it's best to let them sit untouched before moving to the next step.
9. This step is totally optional, but you could add more decoration to the jar, if you like. You could tie a pink ribbon around the mouth of the jar or sprinkle glitter on the jar or draw designs with a marker.
10. Finally, once the Mod Podge is dry and hard and you are done decorating, you can add a tea candle to your lantern, light and enjoy!
Leave a Reply