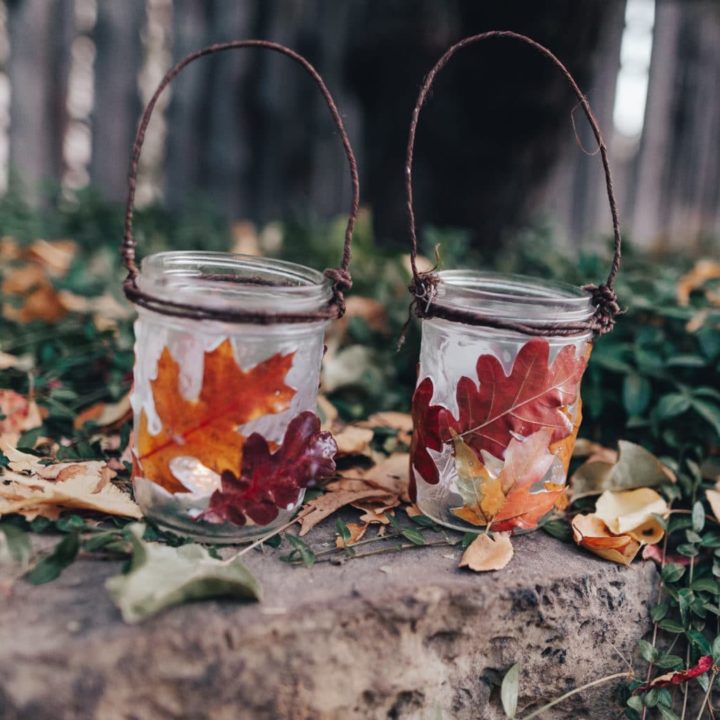
These beautiful home-made Fall Lanterns are easy to make and perfect for honoring the arrival of fall.
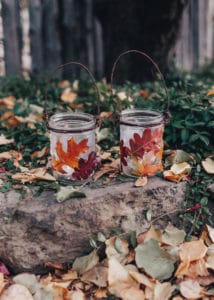
Now that it’s fall, the nights are growing longer and colder. We love to celebrate The Festival of Martinmas and make lanterns for the festival every year. Martinmas, or the festival of St. Martin, is celebrated around November 11 in many Waldorf schools with a nighttime lantern walk. It marks the end of the fall harvest and the arrival of cold, snowy weather. This is a sweet way to celebrate the seasonal change we are experiencing and maintain the symbolic warm light of our spirit. Check out the Moon Child Blog to learn more about it! Even if you don’t celebrate this particular festival, making these Fall Lanterns is a great way to honor the arrival of fall!
What you need to make Fall lanterns
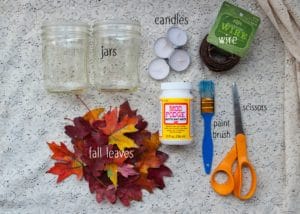
- Jars – Clear glass, large-mouth canning jars work best.
- Fall Leaves – Use colorful, fresh fall leaves.
- Mod-Podge – The matte finish works best for this project.
- Wire – Any wire will do, but I like using thick wreath making wire.
- Scissors – You’ll need wire-cutters or very sharp scissors for this project.
- Paintbrush – A large paintbrush works best.
How to make the handle for your fall lanterns
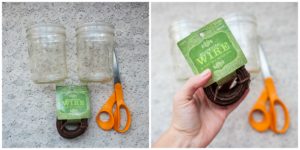
- Pick out jars and wire – Clear 16 ounce, large-mouth, glass canning jars work best, but any jar will work fine. Also, any kind of wire will work, but I like the look and strength of thick wreath-making wire best.

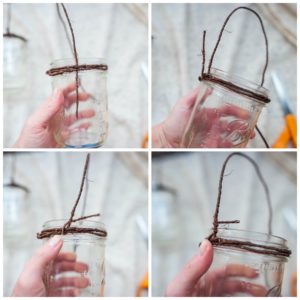
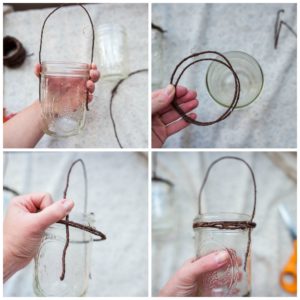
- Measure and cut wire – To measure the length of wire you’ll need, pick up your jar and hold one end of your wire at the mouth of the jar. While holding it in place, wrap the wire around twice with about three inches to spare. Cut the other end of the wire. Once you have the piece of wire that will go around the mouth of the jar measured and cut, you’ll need to cut a second piece of wire that you’ll use to hold the lantern. You’ll need about a foot to make the loop of the handle.

- Secure the handle – After you’ve measure your two pieces of wire, you’ll need to attach them to the jar. First, take the foot-long piece you’re using as the part of the handle you’ll carry, hold one end of the wire against one side of the jar and bend the other end around the top to the other side of the jar. With both sides in place, wrap the first long piece of wire around the mouth of the jar, over the two sides of the wire already there. Pull it very tight and wrap it securely so the wire going around the mouth of the jar holds the two sides of the handle wire pieces in place.
- Finish securing the handle – Once the wire around the mouth of the jar is tight and secure, lift both ends of the piece of wire you’re using for the handle, up toward the sky, and wrap the ends around the handle itself. Check that it is all tight and secure before moving on to decorating the jar.
How to decorate your fall lanterns
- Gather supplies – To decorate your lanterns, you’ll need colorful fresh fall leaves, Mod Podge, and a paintbrush. These are really similar to our Fall Leaf Squashes, so if you did that project, you’ll find this one super easy!
- Add a layer of Mod Podge – Using a medium sized paintbrush, add a thin layer of Mod Podge matte all over the surface of your jar.
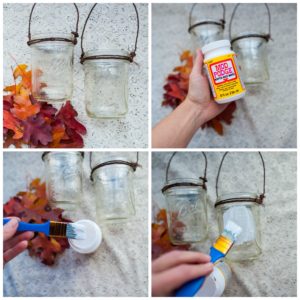
- Add leaves. While the layer of Mod Podge is still wet, start adding colorful fresh fall leaves to the jar. Putting the leaves down in any design or pattern is great, you can even overlap some of the leaves, but be sure to leave some of the glass jar exposed, so you can see some of the light shining through.
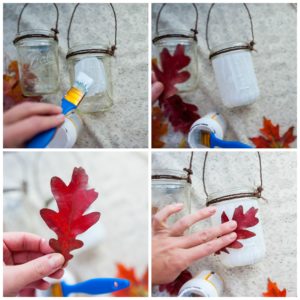
- Add another layer of Mod Podge. Once you have your leaves arranged the way you like, add another thin layer of Mod Podge over the leaves. You may have to hold them in place so that they don’t shift. Once all the leaves are covered, let it dry before adding a second layer.
- Let dry, add a second layer of Mod Podge. Allow the layer of Mod Podge to dry for at least 30-60 minutes before adding a second layer. I only needed two layers of sealer, but you can use as many as you need to, because it will always dry clear.
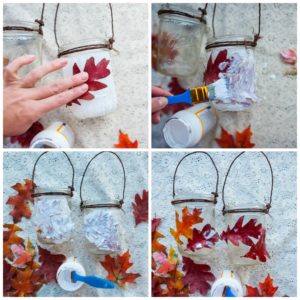
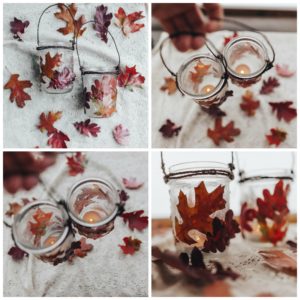
- Let dry overnight. Once you are done adding your layers of Mod Podge, allow your lantern to dry overnight. By the morning, your leaves should be sealed and the glue will be totally dry and they will be ready to use!
- Light a candle. With a grown-ups help, place a candle inside the jar and light it and enjoy!
How to Make Fall Lanterns
These beautiful home-made Fall Lanterns are easy to make and perfect for honoring the arrival of fall.
Materials
- 2 16 oz wide mouth canning jars
- fresh fall leaves
- thick wreath-making wire
- matte Mod Podge
Tools
- scissors
- paintbrush
Instructions
HOW TO MAKE A HANDLE
1. First, pick out out jars and wire. Clear 16 ounce, large-mouth, glass canning jars work best, but any jar will work fine. Also, any kind of wire will work, but I like the look and strength of thick wreath-making wire best.
2. Then you'll need to measure and cut the wire. To measure the length of wire you'll need, pick up your jar and hold one end of your wire at the mouth of the jar. While holding it in place, wrap the wire around twice, with about three inches to spare. Cut the other end of the wire with sharp scissors or wire cutters. Once you have the piece of wire that will go around the mouth of the jar measured and cut, you'll need to cut a second piece of wire that you'll use as the handle to hold the lantern. You'll need about a foot to make the loop of the handle.
3. After you've measured your two pieces of wire, you'll need to attach them to the jar. First, take the foot-long piece you're using as the part of the handle you'll carry, hold one end of the wire against one side of the jar and bend the other end around the top to the other side of the jar. With both sides in place, wrap the first long piece of wire around the mouth of the jar, over the two sides of the wire already there. Pull it very tight and wrap it securely so the wire going around the mouth of the jar holds the two sides of the handle wire pieces in place.
4. Once the wire around the mouth of the jar is tight and secure, lift both ends of the piece of wire you're using for the handle, up toward the sky, and wrap the ends around the handle itself. Check that it is all tight and secure before moving on to decorating the jar.
HOW TO DECORATE THE JAR
1. First, gather supplies. You'll need colorful fresh fall leaves, Mod Podge, and a paintbrush.
2. Then, using a medium sized paintbrush, add a thin layer of Mod Podge matte all over the surface of your jar.
3. While the layer of Mod Podge is still wet, start adding colorful fresh fall leaves to the jar. Putting the leaves down in any design or pattern is great, you can even overlap some of the leaves, but be sure to leave some of the glass jar exposed, so you can see some of the light shining through.
4. Once you have your leaves arranged the way you like, add another thin layer of Mod Podge over the leaves. You may have to hold them in place so that they don’t shift. Once all the leaves are covered, let it dry before adding a second layer.
5. Allow the layer of Mod Podge to dry for at least 30-60 minutes before adding a second layer.
6. Once you are done adding your layers of Mod Podge, allow your lantern to dry overnight. By the morning, your leaves should be sealed and the glue will be totally dry and the lanterns will be ready to use!
7. With a grown-up's help, place a candle inside the jar and light it. Enjoy!
Leave a Reply