These Lace Star Ornaments will make such a pretty addition to your Christmas tree, and they are also a sweet and simple holiday craft that your children will love.

My kids absolutely love making crafts during the holidays. We especially love these lace star ornaments because they’re simple to make, but they turn out so lovely and will look beautiful on anyone’s Christmas tree! Read on to learn how to make your own.
What you need to make lace star ornaments
- Clay. I used Crayola’s Air-Dry Clay, because it’s easy to use and there’s no need to bake it. Another option is using something like Sculpey Oven Bake Clay, and instead of drying the ornaments overnight, you would bake them at 275 degrees for 15 minutes.
- Rolling pin. You will need something to roll out the clay.
- Start cookie cutter. This will be used to cut out shapes.
- Lace. The lace is essential to create the texture and pattern on your star ornament. Crochet patterned or textured paper would work at well.
- Dowel. This will be used to create a hole in your ornament to string a piece of twine through.
- Parchment paper. The clay is rather sticky, so this will prevent your star ornaments from getting stuck on your workspace and the area you choose to set them to dry.
- Twine. You will need something to string through the hike to hang on your Christmas tree. Ribbon or string would work as well.

How to make lace star ornaments
- Roll out clay. Create a medium ball of clay (the size of a tennis ball) and work it in your hands until the clay is soft and mailable. Then, place the ball on a cutting board and using a rolling pin, roll the ball of clay out flat (1/4 in (6mm) thick).

- Arrange lace over clay. Choose your piece of lace and lay over the flattened clay. Make sure it’s covering every surface of the clay and is perfectly flat without any folds or snags.
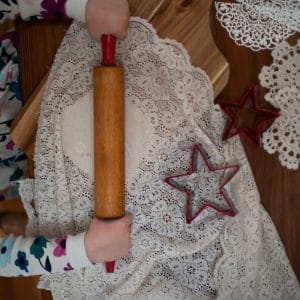
- Roll again. Grab your rolling pin and with light pressure, roll the lace into the clay. Gently, pull up your lace and see the pretty design that is left on your clay.
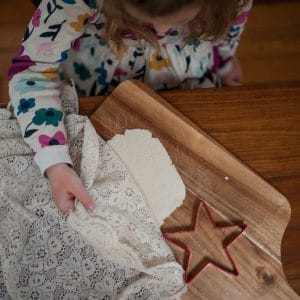
- Cut out shapes. Now pick out a star cookie cutter and use it to cut out the ornament shapes from the lace pressed clay.

- Create holes. Using a small dowel, create a hole large enough for a piece of twine to pass through at one of the star points.
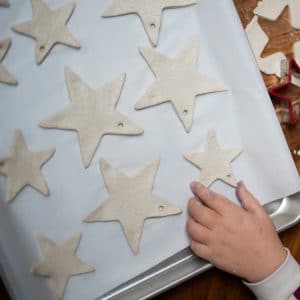
- Let clay harden. Very carefully lift the star from your workspace and place onto a baking sheet lined with parchment paper to dry overnight. You may need to reshape them a little if they lost shape when transferring from workspace to drying space.

- String twine through hole. Once completely dry (about 24 hours), use a short piece of twine (about six inches) to string through the hole. Then tie a knot at the end to complete the ornament.

- Hang up and enjoy! We decided to keep ours simple and plain, but you take yours one step further. Before hanging them on your tree, you could paint your ornaments, or color them, or add glitter!


How to Make Lace Star Ornaments
These Lace Star Ornaments will make such a pretty addition to your Christmas tree, and they are also a sweet and simple holiday craft that your children will love.
Materials
- Clay
- Lace
- Parchment Paper
- Twine
Tools
- Cutting board
- Rolling pin
- Star shaped cookie cutters
- Dowel
Instructions
1. Create a medium ball of clay (the size of a tennis ball) and work it in your hands until the clay is soft and mailable. Then, place the ball on a cutting board and using a rolling pin, roll the ball of clay out flat (1/4 in (6mm) thick).
2. Choose a piece of lace and lay it over the flattened clay. Make sure it’s covering every surface of the clay and is perfectly flat without any folds or snags.
3. Using a rolling pin again, with light pressure, roll the lace into the clay.
4. Gently, pull up your lace and see the pretty design that is left on the clay.
5. Choose a star cookie cutter and use it to cut out the ornament shapes from the lace pressed clay.
6. Using a small dowel, create a hole large enough for a piece of twine to pass through at one of the star points.
7. Very carefully, transfer the star from the workspace and place onto a baking sheet lined with parchment paper to dry overnight. You may need to reshape if they lost any of their shape during the transfer.
8. Once completely dry (about 24 hours), use a short piece of twine (about six inches) to string through the hole. Then tie a knot at the end to complete the ornament.
9. Hang on your Christmas tree and enjoy!
Notes
Optional - To decorate the star ornament further, you could paint them, color them, or add glitter.
Leave a Reply