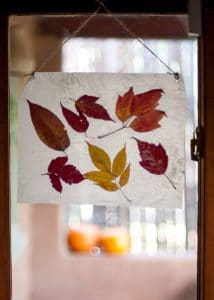
Creating Autumn Stained Glass with your kids is a really sweet and easy way to preserve a piece of fall and make a beautiful piece of art for your home.

The trees around town are really starting to look like autumn! I bet your trees are too! The leaves here are so rich and colorful right now. On a walk recently, my daughter and I gathered several lovely ones and then wondered what we could do with them when we got them home. We both wanted to preserve them somehow and hang them up in our home to admire. My mom, who is visiting us from Montana, suggested preserving them in wax paper, the way they used to do when she was a little girl. The idea of creating Autumn Stained Glass came out of that. Read on to learn what you will need for this project and exactly how to do it.

What You Need to make Autumn Stained Glass
- Leaves
- Block of beeswax to make wax shavings
- Cheese grater
- Wax paper
- Thin towel
- Iron
- Twine
- Scissors
- Hole punch
How to make autumn stained glass
- Gather leaves. You will want to collect autumn leaves at their peak, in order to preserve the richest colors possible. Collect your autumn leaves wherever you can: your own yard, at the park, on a nature trail. Gather golden leaves, red, orange, and even green!
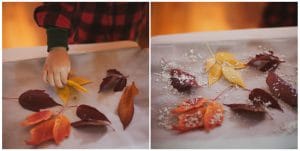
- Arrange leaves. First, grab two pieces of wax paper. Lay one piece down on a baking sheet covered in parchment paper (this will make peeling the wax paper up much easier). Then, arrange your colorful leaves however you like on top of a sheet of wax paper.
- Sprinkle wax. Using a cheese grater and a block of beeswax, grate small shavings of wax to sprinkle on top of the leaves. Use about a 1/4 cup of wax shavings. Then put your second piece of wax paper on top of the leaves.
- Seal leaves. Warm up a clothes iron. As it is heating, put a thin towel over the top of the wax paper. Press on the towel with the hot iron to melt the wax and seal the sheets together. This will take about 2-3 minutes on each side. Once you have finished one side, flip it over and do the other side exactly the same as the first side.
- Display. With scissors, cut the edges of the wax paper to form a square with even edges. Then, using a hold punch, create two holes on both top corners. Tie a piece of twine to each hole, so you can hang it up. Then display your “stained glass” in a window so that the colorful leaves catch the light.

What we love about autumn stained glass
- Preserves autumn. Raise your hand if fall is also your favorite time of year! Just like we preserved a piece of summer with our pressed flower ornaments, this is a sweet way to keep a little piece of autumn with you all year long too. And these sheets of “stained glass” should keep for years to come!
- Great activity for kids. Kids will really enjoy each step of this project from collecting leaves to arranging them on the wax paper to seeing their masterpieces hanging in a window. This craft uses both fine and gross motor skills, gives children an opportunity to get out in nature, and it’s a fun way to create art!
- Quick and easy. This activity requires just a few supplies, which you probably already have around the house. It also only takes about 30 minutes from start to finish (more depending on where and how you gather your leaves). Cleanup is also a breeze. So, you don’t need to spend much time planning or carrying out this craft…something all busy parents might appreciate!


How to Make Autumn Stained Glass
Creating Autumn Stained Glass with your kids is a really sweet and easy way to preserve a piece of fall and make a beautiful piece of art for your home.
Materials
- Leaves
- Block of beeswax (or wax shavings)
- Wax paper
- Thin towel
- Twine
Tools
- Cheese grater
- Iron
- Scissors
- Hole punch
Instructions
1. Gather several autumn leaves at their peak, in order to preserve the richest colors possible. Collect your autumn leaves wherever you can: your own yard, at the park, on a nature trail. Gather golden leaves, red, orange, and even green!
2. Lay one piece of wax paper down on a baking sheet covered in parchment paper. Then arrange your colorful leaves however you like on top of a sheet of wax paper.
3. Using a cheese grater and a block of beeswax, grate 1/4 cup of small shavings of wax. Sprinkle the wax shavings on top of the leaves you arranged on the wax paper.
4. Place your second piece of wax paper on top of the leaves sprinkled in wax.
5. Warm up an iron. As it is heating, put a thin towel over the top of the wax paper. Press on the towel with the hot iron to melt the wax and seal the sheets together. This will take about 2-3 minutes on each side.
6. Once you have finished one side, flip it over and do the other side exactly the same as the first side.
7. With scissors, cut the edges of the wax paper to form a square with straight edges.
8. Using a hold punch, create two holes on both top corners of the square.
9. Tie a piece of twine to each hole, so you can hang it up. Then display your "stained glass" in a window so that the colorful leaves catch the light.
Leave a Reply