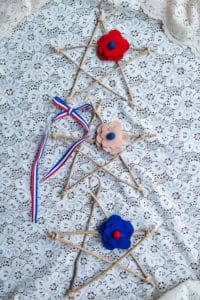
These Twig Stars make a really sweet holiday craft and decoration, but they’re also a fun and simple Forest School inspired math activity that your child will love.

Although it’s summer break, we still try to keep a learning rhythm going throughout the week. I love this project because it combines arts and crafts with science and math. Both of my kids loved going to the forest and collecting twigs for this project. My youngest really enjoyed measuring the twigs, counting the points, and talking about shapes, and my oldest had so much fun putting the star together and creating the felt flowers.
What you need to make Twig Stars
- Twigs – You’ll need five thin, straight twigs that are all around 6 inches long.
- Twine – Any kind of thin yarn or twine will work. We used a natural colored hemp twine.
- Hot glue – This is needed to stick the twigs together and attach the felt flowers to the stars.
- Felt – We chose red, white (cream), and blue for our felt because Fourth of July is coming up, but any colors will do!
- Small Pom-Poms – These will be used for the flower centers. I like using 1 cm wool felt balls, like these.
- Flower Template – Use our Flower Template or create your own for creating the felt flowers.
- Scissors – You’ll need these to cut out the flowers shapes and the twine pieces.
How to make the stars for Twig Stars
- Collect twigs – Head out to your yard, a park, or the forest and collect five thin, straight twigs that are all around 6 inches long. You will need five identical twigs for each star.
- Glue twigs together – Once you’ve collected your twigs, it’s time to glue them together to create a star. Start by placing the first twig on a flat surface at a slight diagonal. At the top of the twig, add a dot of hot glue about a 1/4 inch from the end. Grab a second twig and lay it opposite of the first, glueing the ends together. Now, put a dab of glue toward the top of both twigs (about 2 1/2 inches down) and place a third twig straight across. You should have an “A” shape now. Add a dab of hot glue at the bottom end of the first and second twigs and at both ends of the third twig. Then take your two remaining twigs and glue each one onto the other twigs to create a star shape. Use the photo below as a guide.

- Tie twine to the points – Once the glue has dried completely and your star feels secure, wrap the four lower points with a 4 inch piece of twine. Wrap the twine around twice and then knot it in the back and cut off the excess twine. This detail make it looks nice, but also reinforces the hold. Once the bottom four points are wrapped with twine, take a 6 inch piece of twine and create a slip-knot at the top and then wrap around the top point two times and tie a knot in the back. This will create a little loop to hang up your star.

How to make flowers for Twig Stars
- Pick out felt – We chose red, white, and blue felt for our star flowers, to celebrate the Fourth of July. However, any color you like will work great! We chose do use all one color for each flower, but you could alternate petal colors as well.
- Print out a flower template – Next, either create your own flower template or print out our Flower Template. You will need three different sizes of identical flowers with five petals.
- Cut out flowers – Cut out each flower size from the paper and then trace them with a black marker on the colored piece of felt. Then, carefully cut the felt flowers.

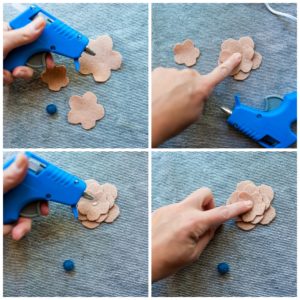
- Glue flower pieces together – Lay the largest flower on a flat surface. Add a dab of hot glue in the center of the flower. Now place the medium sized flower on top of the large flower. Be sure to stagger the petals. Press into the glue until it is secure. Then add another dab of glue to the center of the middle sized flower. And finally, place the smallest flower on top of the medium sized flower. Again, be sure to stagger the petals. Press into the glue until it is secure.

- Create flower center – Once the petals of your flower have been glued together, pick out a small wool craft ball to use as the center. We went with red and blue, but any colors will do! Once you’ve chosen your felt ball, add a dab of glue on the center of the flower and press the ball into it until it is secure.
- Glue flower onto star – Choose a spot on your star that you’d like to display your flower (we went with the upper right hand area) and add small line of hot glue. Press your flower into place and hold until secure.

Learning with Twig Stars
- Forest School inspired – We love Forest School inspired activities because they get us out in and connected to nature. Find out more about the Forest School pedagogy here.
- Science – This is a science activity because you will be using natural materials. While you are outside collecting twigs to use, it’s a great time to discuss where they came from, how plants grow, what the ecosystem is like where you find your twigs, and so on.
- Math – Lots of math was used in this project. First, you have to count and measure the twigs. My 4-year-old loved this step. And since we did three stars, it was a good opportunity for me to explain multiplication to my 7-year-old. (Example, “if we make three stars and we need five twigs for each star, how many twigs do we need in all?”). Also, my kids had fun talking about and creating the star shape and then counting points.
- Art – This project becomes really creative and vibrant when you add the felt flowers. My daughter loves any art project, and this one was no different. She really enjoyed picking out the felt flower colors and cutting them out and glueing them together.


How to Make Twig Stars
These Twig Stars make a really sweet holiday craft and decoration, but they're also a fun and simple Forest School inspired math activity that your child will love.
Materials
- Twigs
- Twine
- Felt
- 1 cm wool craft balls
Tools
- Hot glue gun
- Scissors
- Black marker
Instructions
MAKE THE STARS
1. Collect five thin, straight twigs that are all around six inches long. You will need five identical twigs for each star.
2. Start by placing the first twig on a flat surface at a slight diagonal. At the top of the twig, add a dot of hot glue about a 1/4 inch from the end.
3. Grab a second twig and lay it opposite of the first, glueing the ends together.
4. Now, put a dab of glue toward the top of both twigs (about 2 1/2 inches down) and place a third twig straight across. You should have an "A" shape now.
5. Add a dab of hot glue at the bottom end of the first and second twigs and at both ends of the third twig. Then take the two remaining twigs and glue each one onto the other twigs to create a star shape.
6. Once the glue has dried completely and the star feels secure, wrap the four lower points with a 4-inch piece of twine. Wrap the twine around twice and then knot it in the back and cut off the excess twine. This detail make it looks nice, but also reinforces the hold.
7. Once the bottom four points are wrapped with twine, take a 6-inch piece of twine and create a slip-knot at the top and then wrap around the top point two times and tie a knot in the back. This will create a little loop to hang up your star.
MAKE THE FLOWERS
1. Pick out the felt colors you would like to use. We chose red, white, and blue felt for our star flowers, to celebrate the Fourth of July. However, any color you like will work great! We chose to use all one color for each flower, but you could alternate petal colors as well.
2. Either create your own flower template or print out ours. You will need three different sizes of identical flowers with five petals.
3. Cut out each flower size from the paper and then trace them with a black marker on the colored piece(s) of felt. Then, carefully cut the felt flowers.
4. Lay the largest flower on a flat surface. Add a dab of hot glue in the center of the flower and place the medium sized flower on top of the large flower. Be sure to stagger the petals. Press into the glue until it is secure.
5. Add another dab of glue to the center of the middle sized flower. And place the smallest flower on top of the medium sized flower. Again, be sure to stagger the petals. Press into the glue until it is secure.
6. Once the petals of your flower have been glued together, pick out a small wool craft ball to use as the center. We went with red and blue, but any colors will do! Once you've chosen your felt ball, add a dab of glue on the center of the flower and press the ball into it until it is secure.
7. Choose a spot on the star that you'd like to display your flower (we went with the upper right hand area) and add small line of hot glue. Press your flower into place and hold until secure.
Leave a Reply