Celebrate the arrival of Spring by making one of these cute Blooming Twig Trees using all the pretty blossoms popping up right now! They’re beautiful, simple and fun to make.

We have an old crabapple tree in our yard and every spring it never disappoints. The blossoms are big and pink and beautiful. We love it it so much! But like all the other blossoms around our yard, they never last quite as long as I’d like them to. My daughter and I came up with this sweet craft to enjoy our crabapple blossoms even more. We used crabapple blossoms, but any kind of blossoms will do!
What you need to make blooming twig trees
- Cardboard – We used a piece of cardboard about 6 inches by 11 inches long, but any size or shape will work just fine!
- Twigs – Twigs are needed to create the tree’s trunk and branches. Twigs with a little curve to them work best, so that it resembles a real tree’s curves. Gather 6 to 12 twigs between 1 and 6 inches long to use.
- Blossoms – We used crabapple tree blossoms because they have large and vibrant blossoms. The pink color really pops against the cardboard. But any kind of blossom you can get your hands on will be beautiful! If you can’t find blossoms, you could use leaves or grasses or other types of flowers.
- Glue – Beyond the three main materials for this craft, you’ll just need glue to put your twig tree together. We used a hot glue gun, because it’s quick and the hold is strong. However, regular school glue will work fine too, you just have to hold the blossom onto the dab of glue a little longer to get it to stay put.

How to make a blooming twig trees
- Pick your your cardboard. During this quarantine period, we’ve been ordering a lot more household goods than usual. So now we are sort of drowning in cardboard boxes. This is a really great craft to use up some of that extra cardboard! We used a piece of cardboard about 6×11 inches long, but any size and shape will work. Just be sure it’s clean and free of snags or tears.
- Cut out your cardboard. Once you’ve picked out a clean piece of cardboard, grab a sharp pair of scissors and cut out a rectangle shape. Young kids may need assistance with this.
- Gather twigs and blossoms. Now that your cardboard is ready, it’s time to gather your remaining supplies: twigs and blossoms. We found what we needed out in our yard, but if you don’t have a yard with blooming trees right now, consider taking a walk around your neighborhood or visiting a nature area to gather your supplies. We chose varying lengths of twigs with curves and forks in them, so that the twig tree would look more life-like. Then we used blossoms from our crabapple tree. Pick several blossoms at the base of the flower. We used about 12 blossoms for our twig tree.

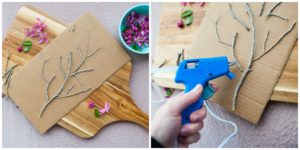
- Arrange twigs on cardboard. Place your twigs in a pile and grab the longest one to use as the trunk. Lay that on the piece of cardboard first, and then arrange smaller ones around the top half of the long twig as the branches. Use forked and curved twigs, so they look realistic.
- Glue twigs onto the cardboard. Once your twigs are laid in place and they resemble a real tree, grab some glue and start glueing them to the cardboard. We used hot glue, because it is quick and has a secure hold, but regular school glue will work as well.

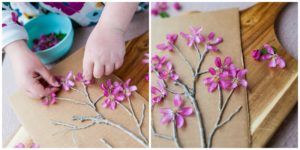
- Glue blossoms onto the twig tree. After you’ve glued on the twigs and it resembles a real tree, start adding blossoms. Add a dab of glue wherever you’d like a blossom to go, and then gently hold the blossom in place until the glue dries.

- Optional. Once you’re finished making your Blooming Twig Tree, you could paint your blossoms with Mod-Podge. You can find it online here. This may flatten the appearance of your blossoms and require extra drying time, but it will keep your blossoms looking more vibrant and fresh for longer. If you don’t use Mod-Podge to seal it, the blossoms will dry out rather quickly.
Here’s why we love these blooming twig trees
- Simple – This is a simple craft that only requires three materials: cardboard, blossoms, and twigs. Since it doesn’t require many materials, you’ll probably be able to make one any time without leaving your home or yard.
- Creative – We love this craft because it helps your kids use their imaginations to create beautiful art. Kids love making art and having their artistic creativity acknowledged and appreciated. The more opportunities children have to make art, the happier they’ll be!
- Recycle – This craft uses a recycled material: cardboard. You can give it one more use before sending it to the recycle bin! Which is good for the earth and it provides a great opportunity to explain the importance of reducing, reusing and recycling to our children. Just like our Nature Easter Egg craft, this one is also a great way to reuse materials and reduce our waste!
- Free – This craft won’t cost you a penny because you probably already have some cardboard and glue on hand and twigs and blossoms are free!
- Outdoors – To do this craft, you must go outside to collect your twigs and blossoms. During this quarantine period, it’s extra important to get our kids outside playing and enjoying nature.
- Seasonal – Crafts that help your children learn about the seasons are important. It helps them embrace change, it teaches them about climate and weather, and it helps them anticipate seasonal changes and learn the characteristics for each season. Blossoms are specific to spring, so this will give you an opportunity to talk more about spring!


How to Make Blooming Twig Trees
Celebrate the arrival of Spring by making one of these cute Blooming Twig Trees using all the pretty blossoms popping up right now! They're beautiful, simple and fun to make.
Materials
- Cardboard
- Twigs
- Blossoms
Tools
- Glue
- Scissors
Instructions
1. Cut out a medium sized piece of cardboard. We used a piece that was about 6 inches by 11 inches long, but any size and shape will work. Just be sure it's clean and free of snags or tears.
2. Gather twigs of varying lengths and textures. Be sure to choose some with curves and forks in them, so that your twig tree looks more life-like.
3. Gather blossoms. We used blossoms from our crabapple tree, but any blossoms will do. Pick several blossoms at the base of the flower. We used about 12 blossoms for our twig tree.
4. Lay your twigs in a pile and grab the longest one to use as the trunk. Lay that on the piece of cardboard first, and then arrange smaller owns around the top half of the long twig as the branches. Use forked and curved twigs, so they look realistic.
5. Once your twigs are laid in place and they resemble a real tree, grab some glue and start glueing them to the cardboard. We used hot glue, because it is quick and has a secure hold, but regular school glue will work as well.
6. After you've glued on the twigs and it resembles a real tree, start adding blossoms. Add a dab of glue wherever you'd like a blossom to go, and then gently hold the blossom in place until the glue dries.
Notes
*Optional -- Once you're finished making your Blooming Twig Tree, you could paint your blossoms with Mod-Podge. This will may flatten the appearance of your blossoms and require extra drying time, but it will keep your blossoms looking more vibrant and fresh for longer. If you don't use Mod-Podge to seal it, the blossoms will dry out rather quickly.
Leave a Reply