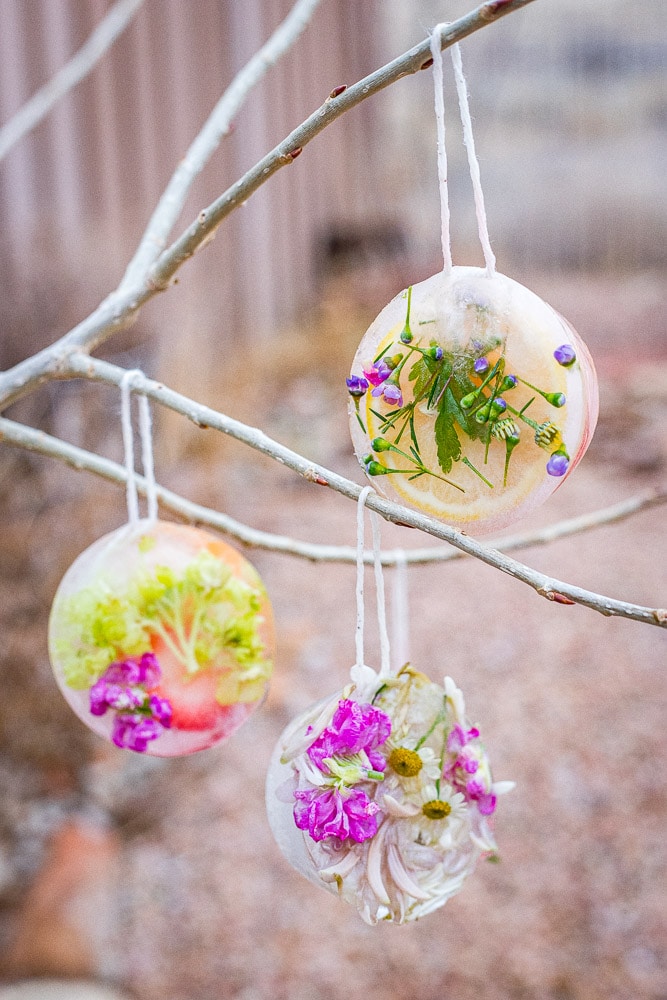
These Ice Ornaments are a simple winter activity for kids and they’re such a great way to spruce up the bare winter trees in your yard.

Anybody else ready for spring? My kids and I always end up feeling a bit tired of winter by the end of February. Snowy days aren’t such a novelty anymore and the crusty snow, brown grasses, and bare trees in our front yard are beginning to look a little dreary. These sweet ice ornaments will really spruce up your bare winter trees with a little pop of color though! They’re a good reminder that spring is right around the corner! Oh, and they’re simple and fun to make too.
What you need to make ice ornaments
- Muffin tin. You’ll need a muffin tin to contain the material and water, which will shape your ornaments.
- Twine or yarn. Add a loop of twine or yarn to your ornaments in order to hang them on an outdoor tree.
- Colorful organic materials. Choose colorful organic materials to add in your ice ornaments. Things like fruit and flowers work well.
- Water. Water is needed to pour over the material to create ice.

How to make ice ornaments
- Choose colorful materials. Look around your home and pick out some bright and colorful materials to add to your ice ornaments. Flowers and herbs are great because they give a pretty pop of color and remind us of spring. Fruit is also a great option because it’s colorful, can be cut into fun shapes, and a big bonus – it will feed the hungry birds too!
- Arrange material into a muffin tin. Once you’ve picked out some organic material for your ornaments, start arranging them in the muffin tins. Layering various colors and textures works well, so that all sides have a pretty color pattern and shape. Or arranging by color is fun too.
- Add twine or yarn to your muffin tin. After you’ve arranged your materials in an artful way, cut a six inch piece of twine and tie a knot at the end, creating a loop. Place the knot between the layers of your material to hold it in place.
- Pour water over material. Now, pour room temperature water over each muffin tin filled with material. Fill it all the way to top.
- Freeze. Finally, once each muffin tin is filled with water, carefully transfer the tin to a freezer and leave for several hours until water has turned into ice.
- Decorate. Once your ornaments are frozen, it’s time to pop them out of the muffin tin and decorate a bare tree outside. If they’re stuck in the muffin tin, they many need to thaw for a few minutes. Just be sure not to pull on the twine too hard or it may slip out. Once you’ve popped them out of the muffin tins, pick a bare tree and start decorating!

How to enjoy your ice ornaments
- Decorate an outdoor tree! Decorating is fun any time, but it’s especially fun when you’re making an otherwise dreary wintertime tree look more beautiful and happy! And depending on the daily temperature of where you live, your ornaments may even last for several days. It’s such a joy to give your bare winter trees a little life in the dead of winter and seeing a fun pop of color in your yard. They put me in mind of the flower pressed ornaments we made last summer, which was another way to spruce up the trees in your yard.
- Feed the birds! You could use only edible materials to create your ornaments and then they would serve as bird feeders as well. The hungry, cold weather birds will thank you for the treat!
- Do math! Izzy’s son had a ton of fun setting his ornaments on the ground and lining them up. You could help your kids line them up to make patterns, or you could count them, or arrange them into various shapes.
- Make a match game! Instead of arranging your material haphazardly, you could intentionally color code them. For example, add only red material to one muffin tin (use strawberries, red flowers, raspberries). Then, add only pink material to another tin (pink flowers, diced beets, red onion slices). And orange to another (orange slices, carrot peels, orange flowers). Then blue or green or purple to the others. Then, you can help your children find color matches.
- Smash them! I don’t know about your kids, but at the end of winter my kids start getting pretty stir crazy and I need to find interesting outlets to help them burn off a little energy and use their bodies. Smashing the ice ornaments definitely wasn’t the intended purpose, but as my four-year-old tried to hang one of the ornaments on a tree branch, it slipped and fell to the ground. And broke. When it shattered into many pieces, initially he was really bummed, but then he realized it was actually kind of fun to throw them to the ground and watch the ice shatter. An accident turned into a safe way to burn off his crazy kid energy!
- The possibilities are endless! And this activity is so simple and inexpensive and requires very few materials, that you could do it over an over.


How to Make Ice Ornaments
These Ice Ornaments are a simple winter activity for kids and they're such a great way to spruce up the bare winter trees in your yard.
Materials
- Muffin tin
- Twine or yarn
- Colorful organic materials (fruit and flowers work well)
- Water
Tools
- Freezer
Instructions
1. First, choose colorful materials to use for your ornaments. Flowers and herbs are great because they give a pretty pop of color and remind us of spring. Fruit is also a great option because it's colorful, can be cut into fun shapes, and a big bonus - it will feed the hungry birds too!
2. Once you've picked out some organic material for your ornaments, start arranging them in the muffin tins.
3. After you've arranged your materials in an artful way, cut a six inch piece of twine and tie a knot at the end, creating a loop. Place the knot end between the layers of your material to hold it in place. You'll need this to be able to hang it.
4. Now, pour room temperature water over each muffin tin filled with material. Fill it all the way to top.
5. Finally, once each muffin tin is filled with water, carefully transfer the tin to a freezer and leave for several hours until water has turned into ice. It could take up to 8 hours to freeze, so be sure to give yourself plenty of time for this project.
6. Once your ornaments are frozen, it's time to pop them out of the muffin tin and decorate a bare tree outside. If they're stuck in the muffin tin, they many need to thaw for a few minutes. Just be sure not to pull on the twine too hard or it may slip out.
Notes
Remember freezing time. These ornaments take at least 8 hours to freeze before you can use them.
Leave a Reply