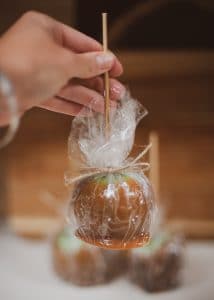
These Halloween Caramel Apples are a fun and delicious way to get into the Halloween spirit. This activity may not be the healthiest one, but it sure makes kids happy!!

When I was little, every year, our neighborhood would celebrate Halloween together. My friends who lived up the road had a haunted house set up in their barn, another neighbor would paint our faces and help with costumes, and my mom always hosted Halloween games. After the games were over, my mom would hand us all a caramel apple to eat on our way to the haunted house up the road. Now, as an adult, caramel apples alway bring back such fun memories for me, and I want to give similar ones to my kids. Read on to learn how to make yours!
Halloween Caramel Apples RECipe
- Ingredients: I used 1 cup of salted butter, 2 cups of brown sugar, 1 cup of light corn syrup, 1 can of sweetened condensed milk, 2 teaspoons of vanilla, and a 1/2 teaspoon salt.
- Instructions: Prepare the apples by washing them, jamming wooden skewers 3/4 of the way through them, and placing them on a large baking sheet lined with wax paper. Then, using a heavy bottomed pot, melt butter over medium heat, and add sugar, corn syrup, sweetened condensed milk, and salt. Using a wooden spoon, stir constantly until temperature reaches 235 degrees (about 15 minutes). Remove from heat and stir in vanilla. Dip apples and then decorate!

Step-by-Step directions to make Halloween Caramel Apples
- Prepare your apples. We used small organic green apples for our Halloween Caramel Apples. I like the contrast between the tart apple and the sweet caramel. But whatever kind of apple you choose, just be sure to look for nice round apples, without any major bruises. Choose 12 of even sizes. Rinse the apples in warm water and then use a hand towel to dry them. This will rub off the wax found on store-bought apples. Stick a wooden skewer through the top of the apple, pushing it 3/4 of the way through. Line up the apples on a baking sheet lined with wax paper. Then, pop the entire baking sheet into the refrigerator while you make the caramel sauce.

- Make your caramel sauce. Whipping up a pot of caramel sauce is not a difficult task, but it does require patience and all your attention. There are many recipes out there, but I love the one from my mom’s old Betty Crocker cookbook. You can also find it here. Oh, and a few reminders before you get started – cook over medium heat, stir constantly, and use a candy thermometer to get an accurate temperature.

- Dip your apples. Dipping the apples is the trickiest part of this activity. Therefore, it is definitely a task for an adult. The caramel sauce is hot and it takes a bit of coordination to dip the apples into the sauce and spin them around to get an even coat. Once the apple are fully coated in caramel, let them cool for a few minutes before giving them to your kids to decorate. You want the caramel sauce to be cool, but soft enough to work with and for things to stick to it.

- Decorate your apples. This is the fun part! I set up a decorating station to make it easier and more efficient for my kids to decorate their apples. In front of each kid, I put a plastic plate for them to work on. And then, on one side, I had a the tray of prepared apples, in the middle the pot of hot caramel, and on the other side, I had four bowls with different toppings. We used spooky looking sprinkles, Halloween M&M’s, nuts, and melted chocolate.

Completing this Halloween Caramel Apples activity
- Decorating. I encouraged my kids to really go for it, and have a lot of fun while decorating. They were pretty excited about the eyeball sprinkles, chocolate drizzle, and sticking M&M’s wherever there might be extra space! It was messy, but they had so much fun, that it was totally worth it.

- Enjoy. Most caramel apple recipes will tell you to pop them into the refrigerator for at least ten minutes to help them set, but in my opinion, these Halloween Caramel Apples are the best right away, when the caramel is still a little warm and soft. My kids agree…yum!

- Store. These caramel apples keep for quite a while in the refrigerator. Two weeks, at least. I wrapped our extras in plastic wrap and tied the ends together with a piece of twine. Then, I put them in a large ziplock bag before putting them in the refrigerator. My kids would have loved to just devour them all, right then and there, but they finally agreed it would be best to gift most of them to our friends instead. Phew!


How to Make Halloween Caramel Apples
Materials
- 12 wooden skewers
- 12 green apples
- butter
- brown sugar
- light corn syrup
- sweetened condensed milk
- salt
- vanilla
- wax paper
- baking sheet
- candy thermometer
- heavy pot
- wooden spoon
- Halloween inspired toppings
Instructions
1. Prepare the apples by washing them, drying them, jamming wooden skewers 3/4 of the way through them, and then line them up on a large baking sheet lined with wax paper.
2. Make the caramel sauce by melting 1 cup of salted sweet cream butter in a heavy bottomed pot over medium heat. Then add 2 cups of brown sugar, 1 cup of light corn syrup, 1 can of sweetened condensed milk, 2 teaspoons of vanilla, and a 1/2 teaspoon salt. Stir constantly with a wooden spoon until your candy thermometer temperature reaches 235 degrees (about 15 minutes). Remove from heat and stir in vanilla.
3. Dip you apples by holding the skewer and dunking the apple into the caramel sauce. Spin it around a few times to get an even coat. Place the freshly dipped apple down until it cools slightly.
4. Set up a decorating station with bowls filled with various Halloween inspired toppings like sprinkles, M&M's, chocolate, and nuts.
5. Give your children the cooled, but still soft caramel apples to decorate and let them go nuts!
6. Place the finished Halloween Caramel Apples in the refrigerator for about ten minutes to set. Then wrap in plastic wrap and/or store in a ziplock bag in the refrigerator for up to two weeks.
Leave a Reply