These Rainbow Stick Wind Chimes are one of the cutest and easiest DIY wind chimes out there! They are the perfect nature-based craft for kids of all ages that allows so much creativity and individuality. And, you only need three materials to make them!
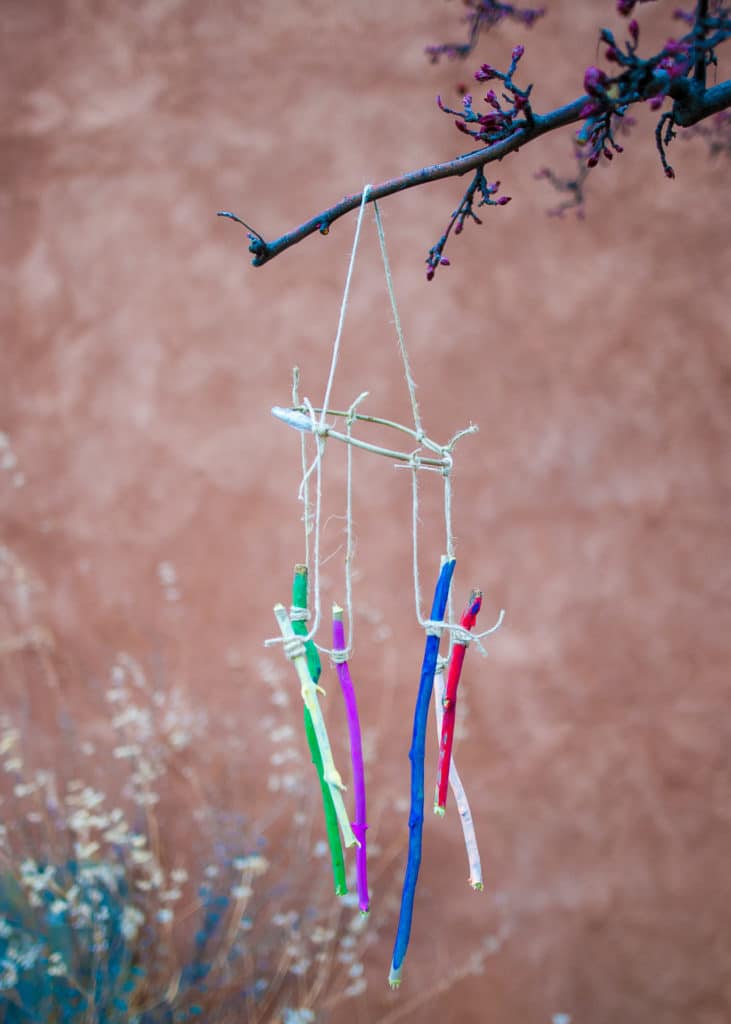
These homemade wind chimes are an easy way to turn your nature walk into a beautiful wind chime craft. All you need to make them are sticks, twine, and paint!
Any links in the post could be affiliate links which is a way to support my blog without spending any money! I can earn a commission when you buy a product I recommend.
materials needed for Rainbow Stick Wind Chimes
- Sticks – Six sticks will be needed for this project. They can vary in length but try to keep them all about the same width. Ours were about 1.5 cm thick.
- Paint – Rainbow-colored paints are ideal for this project, but when working with a limited craft supply during this period, just use what you’ve got! I didn’t have orange or yellow, so I used white paint and added a few drops of food coloring to them. Not perfect, but it works in a crisis! And, uh-oh, you don’t have paint? No problem, markers will work too! You can also check out my DIY paints for an easy recipe from pantry ingredients!
- Twine – You’ll need twine, fishing line, or thin yarn for this project. We used hemp twine since it’s what we had on hand. No going to the stores to buy special twine right now!
- Optional items – We only used sticks for our wind chimes, but you can get creative here and add whatever you like. I personally prefer a low-sound wind chime because my kids are always loud and more noise feels like a lot. Stones, feathers, bottle caps, pony beads, and glass would all be fun options too! I would highly recommend adding metal, glass or beads to add beautiful sound to these wind chimes.
How to create your DIY nature Wind Chimes
- Gather six sticks – Find six sticks or twigs in your yard or out in the forest. They can vary in length, but try to keep them all around the same width. We used sticks about 1.5 cm thick.
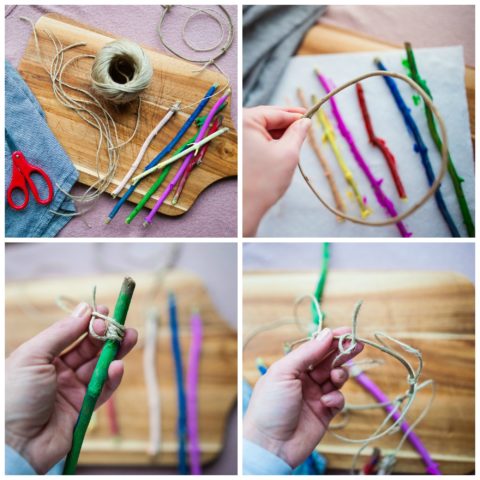
- Gather one long, thin, and flexible twig – You will need to fashion a circular shape to hang your sticks from at the top of the wind chimes. I cut off a long and skinny twig about 2 feet long from our lilac bush. You’ll want to use a green (or live) twig for this, because it will be more flexible and won’t snap when you manipulate it into a circle.
- Create a circle out fo the twig – Manipulate and bend the skinny twig until you’ve made it into a circle. Then, you’ll need to attach the two ends together to create a continuous circle. I used clear masking tape, because it was quick and super easy, but you could glue it or tie it together with twine.
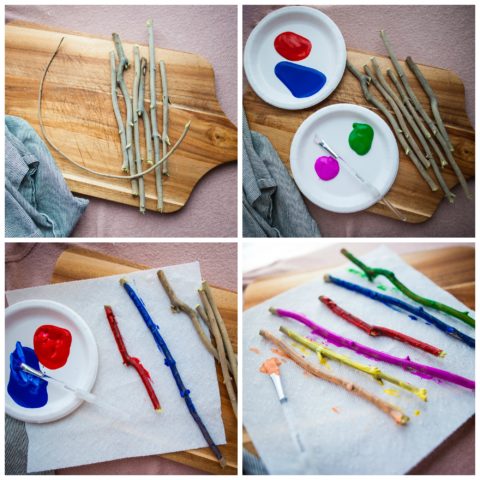
- Paint your sticks – We chose rainbow colors: red, orange, yellow, green, blue, and purple. But you don’t have to stick with the rainbow theme. Choose whatever colors you like! Just make it happy and bright. Paint each stick a different color and paint it entirely. You can get creative here: paint it all one color or you could paint designs on it or patterns, whatever you like!
- Let your paint dry – Leave your painted sticks alone to dry for at least an hour or two. Setting them in the warm sunshine will speed up the process.
- Create the twine hanger – While your sticks are drying, cut a piece of twine about two feet long. Tie one side to the circle twig and tie the other end directly on the other side of the circle.
- Tie the sticks onto the top circle – After your sticks dry, cut six identical pieces of twine, about one foot long. Tie one end of the twine to the painted stick. Do this with the remaining five sticks. Then, take the other end of the twine and tie it onto the circle top. Be sure to hang them evenly, so it’s not too heavy on one side and lopsided.
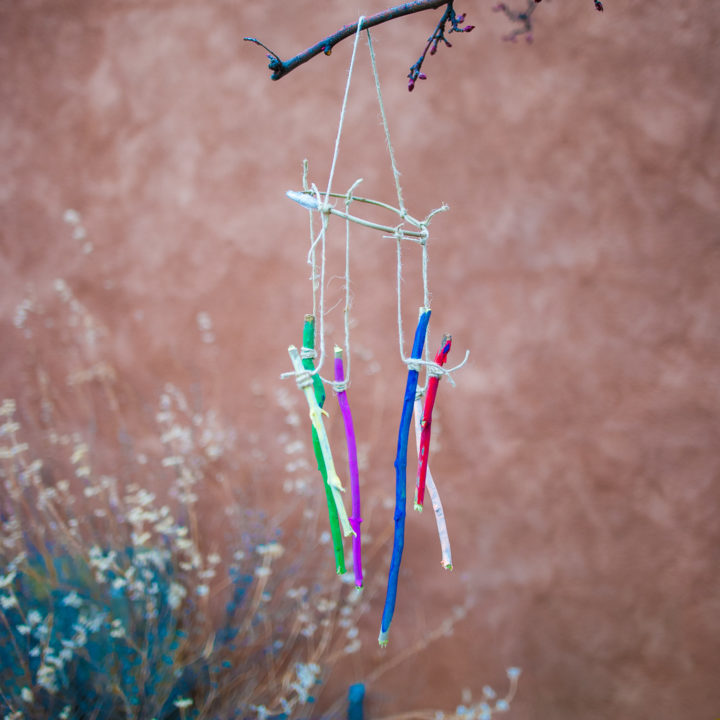
- Hang on a tree outside – Now, go find a spot to hang it in your yard! We chose a tree right outside our biggest window so we can see it (and sometimes hear it) as the wind blows outside.
WHAT IS SO GREAT ABOUT RAINBOW STICK WIND CHIMES
- Uses few materials – This a great project when you are running low on supplies. We made this and were able to spend zero dollars on a whim so you can easily put unused items to good use. You can easily customize it to what you have on hand, tin cans can add a beautiful sound, plastic cubs can be an awesome base to tie string too. You could also use a piece of driftwood to tie the strings too and make it a really aesthetically pleasing project.
- It is nature-based – This is a project that gets your kids outside in nature. We had so much fun hunting for our perfect sticks to make this fun diy wind chime! There is no better time to get out there and enjoy nature. The more time kids spend outside, the healthier and happier they will be!
- It is forest-school inspire – Like the above point, there is no better time than now to familiarize yourself with the forest school pedagogy and truly turn this into more educational activities. Get more information here!
- Uses fine motor skills – Making these wind chimes will require plenty of hand-eye coordination for your child. It will give them an opportunity to practice their fine motor skills as they paint the sticks and tie them to the circular top.
- It encourages creativity – From choosing the sticks to painting them, this project has so many ways of getting your kids more artistic and creative. It also builds confidence when they get to have their own wind chime to completely control the creative process with.
- It is a fun way to teach your kids – This project is a fun way to teach your children about colors (the rainbow colors), nature (the sticks collected), and weather patterns (the wind that blows the wind chimes). You can incorporate math concepts by measuring the lengths of string and even talk about eco-friendliness by hitting up a thrift store to find items for your wind chime if the weather outside isn’t cooperating. It’s also a great way to jazz up your outdoor space and celebrate your child’s work.
ALTERNATIVE WAYS TO MAKE A DIY WIND CHIME
- There are seriously so many ways to customize your own wind chime and it is in my list of easy crafts for a reason. You can make a beaded wind chime with a plastic bottle, tin can or even flower pots to make those beautiful clinking noises.
- You can use old keys for an eco-friendly, recycling-fun twist.
- Varying the different sizes of items you use, sticks, beads, keys or whatever gives a fun spin and makes less pressure on perfection for kids.
How to Make DIY Nature Wind Chimes
These Rainbow Stick Wind Chimes are a cute and easy nature based craft that will keep your kids engaged and feeling creative. And, you only need three materials to make them!
Materials
- Sticks
- Paint
- Twine
Tools
- Scissors
- Paint brush
Instructions
1. Gather six sticks to use. They can vary in length, but keep them all around the 1.5 cm thick.
2. Find a long, thin, and flexible twig about 2 feet long. You'll want to use a green (or live) twig for this, because it will be more flexible and won't snap when you manipulate it into a circle. Fashion it into a circle and secure the two ends together. You could use tape, glue or twine.
3. Paint your sticks in rainbow colors: red, orange, yellow, green, blue, and purple. Paint the entire stick, top to bottom and front to back so that all of the wood is covered in paint.
4. Let your paint dry for at least an hour or two. Setting them outside in the warm sunshine will speed up the process.
5. While your sticks are drying, cut a piece of twine about two feet long. Tie one side to the circle twig and tie the other end directly on the other side of the circle.
6. After your sticks dry, cut six identical pieces of twine, about one foot long. Tie one end of the twine to a painted stick. Then do the same with the remaining five sticks. Then, take the other end of the twine and tie it onto the circle top. Be sure to hang them evenly, so it's not too heavy on one side and lopsided.
7. Now, go find a spot to hang it in your yard and enjoy!
Notes
Allow at least two hours for the paint to dry before completing the remaining steps.
Leave a Reply